Keeping track of your overall Crypto Portfolio is not as straight forward as it should be. Investing into crypto currencies can leave you with multiple wallets and online resources. Each one may contain different coins and tokens for different purposes.
It is highly recommended to store all ( or as much as possible ) offline, detached from the internet. This way hackers won’t be able to get their fingers on your hard earned Bitcoins, Ethereum, etc.
I have started to look into Crypto currencies in early 2018 and I see great potential in the basic ideas behind the technologies. While my timing was especially bad I wanted to know what the fuzz was all about. The best way to understand things though is to start playing with them. So I did spend some time and money learning a new technology.
Shut up and take my money
Shut-up-and-take-my-money
You need to sign up with and exchange when you want to buy some coins or tokens in order to convert your dollars into a crypto-currency. With Coinbase being one of one most popular which people would recommend for n00bs.
Coinbase allows you to convert to deposit funds using your credit card or your bank account information. Paypal is no longer supported. You can then exchange your fiat currency ( I.e. Dollars, Euros etc. ) into Bitcoin, Bitcoin Cash, Etherium, or Litecoin. Any other crypto currency requires you to sign up with another exchange of which there are many to choose from.
Coinmarketcap.com, and coincap.io provide you the information as to which exchange supports the crypto token you are interested in.
Binance is one of those larger exchanges which has received good online reviews and has supposedly the lowest transaction fees.
Getting your hands on some crypto coins or tokens also requires you to safely store them somewhere. Here we have probably one of the weakest points in this area. Every crypto-currency has their own way of storing the tokens. You can keep them on your computer, in an online wallet, in offline wallets or as a paper wallet. You will quickly arrive at a point where you can lose track of your virtual wealth ( or as we have seen recently, the decline thereof ).
Crypto Portfolio
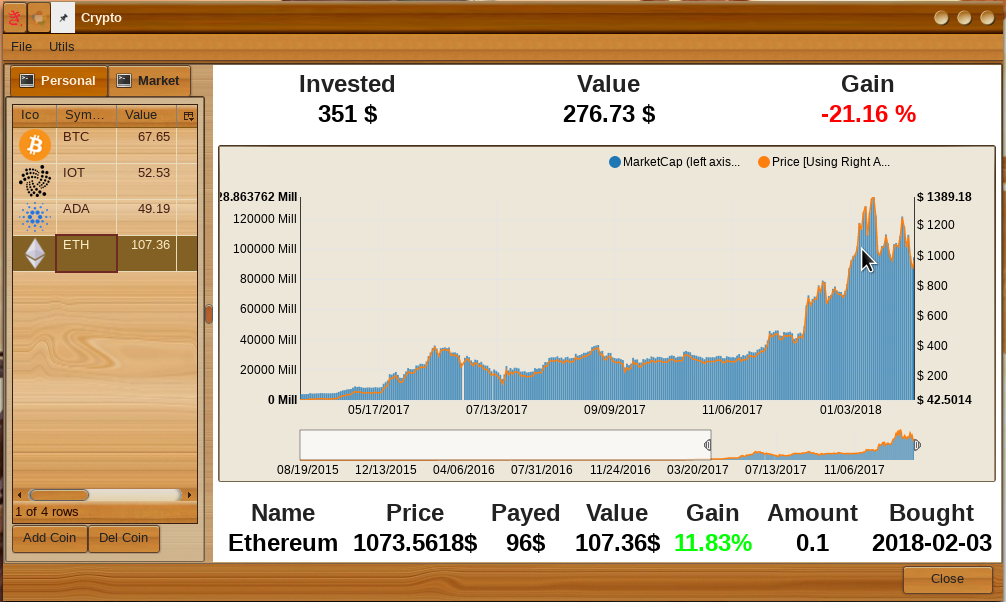
So I wrote a Crypto Portfolio app which will allow you to enter your token amount and then look at the market data for it. I will not store this information on the server but instead store it in your browsers’ cache so you don’t have to fear releasing any data to my servers.
One thing I quickly realized is that almost everything you do in crypto will cost you either a fee or a transaction cost.
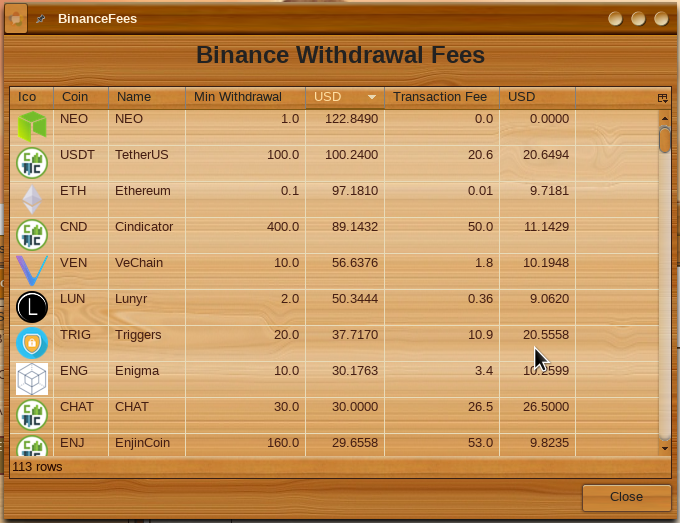
Binance fees
So yeah Binance has a 0.1% trading fee however one thing which you will not see right away is that you will not be able to convert all of one crypto token into another crypto token.
Binance will always leave you with some leftover on their platform. These may vary but my worst case leftover position is worth about US$1.00.
On top of that Binance also requires a minimum transaction for certain coins. E.g. you require at least US$97.181- ( as of Feb 2 2018 ) in Etherium before you can transfer it out of Binance.
Then you have to pay for the actual transaction fees which for Etherium ar 0.01ETH, which is … well about $9.71 as of this date.
Since Binance does not display this information in a useful way I went ahead and added this into a table in my little app which you can sort to gather some more information on trading conditions of a certain coin. [ Menu -> Utils -> Binance Fees ]
So you add this all up and you end up spending a lot of money in the whole exchange process.
If you exchange E.g. $100,- by the time it leaves Coinbase you are down to about $97,- Then you exchange it for ETH on Binance and send it back to your private wallet, you end up with only about $85,- worth of ETH.
This of course does not take into account the huge market swings, which could increase or decrease your position a few percentage points in the time it takes to go through the whole operation.
To sum it all up
First though I have to remind you that; yes it is possible to lose money, which is why you should never put in more than you can afford to lose.
This app is in its early stages and I will certainly add more features as time permits. Please feel free to check it out here …
Please leave me some feedback for enhancements if you find it useful. Or follow the link below to the source code, make changes yourself, and then send them to me for integration 🙂
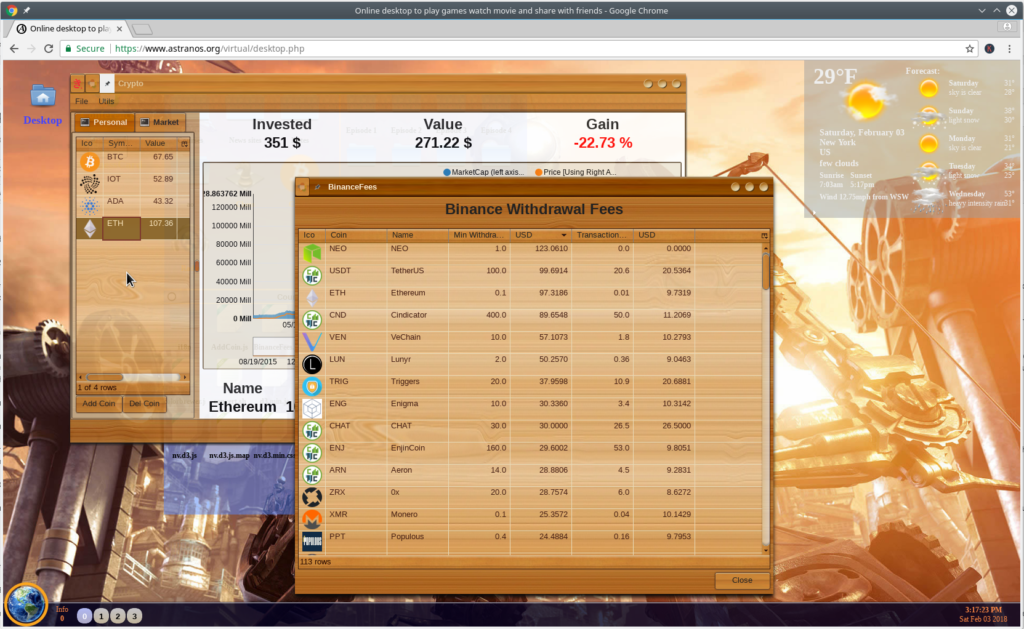
If you click on the image below you can start using the app online from within my WebOS.
You can find it under [Start -> Utils -> Crypto ]. Note: This app does not send any data back to any server.
So the weekend is here and you are sitting in front of your computer and don’t know what to do.
You are still bored after watching YouTube videos all day.
Don’t Worry, you have come to the right place. I will show you how to display funny text,
add a spinning 3D globe to your web page, build a calculator for your math homework or in case you work requires you to calculate the remaing fuel contents on your rocket entring an orbit around Mars. and more …
Here are 9 things you can code when you are bored.
Hello World
This “Hello World” jumps out and is a real attention seeking device. Your eyes are automatically caught paying more attention to it. If you want to drive people into madness you can display your whole page using this quirk.
You will certainly be rewarded with a firestorm of complaints.
<html>
<head><title>bored_1</title></head>
<body>
<p></p> <p></p>
<center><b><div id="OUT"></div></b></center>
<script>
var div = document.getElementById ( "OUT" );
div.innerHTML = "Hello World";
function randomClr ( char ) {
var r = parseInt ( Math.random ( ) * 255, 10 );
var g = parseInt ( Math.random ( ) * 255, 10 );
var b = parseInt ( Math.random ( ) * 255, 10 );
var ret = "<font color='rgb(" + r + "," + g + "," + b + ");'>" + char + "</font>";
return ret;
}
function randomType ( char ) {
var ret=char, r = parseInt ( Math.random ( ) * 4, 10 );
switch ( r ) {
case 0: ret = "<b>" + char + "</b>"; break;
case 1: ret = "<i>" + char + "</i>"; break;
case 2: ret = "<sup>" + char + "</sup>"; break;
case 3: ret = "<sub>" + char + "</sub>"; break;
}
return ret;
}
setInterval ( function ( ) {
var html="", text = "Hello World";
for ( var t=0; t<text.length; t++ ) {
var clr = randomClr ( text[t] );
html += randomType ( clr );
}
div.innerHTML = "<h1>" + html + "</h1>";
}, 500 );
</script>
</body>
</html>
Random Password generator
This generator will allow you to create your very own randomly generated password string.
<html>
<head><title>bored_2</title></head>
<body>
<p></p> <p></p>
<center><b><div id="OUT"></div></b></center>
<script>
var div = document.getElementById ( "OUT" );
var randomString = function(length) {
var text = "";
var possible = "ABCDEFGHIJKLMNOPQRSTUVWXYZabcdefghijklmnopqrstuvwxyz0123456789";
for(var i = 0; i < length; i++) {
text += possible.charAt(Math.floor(Math.random() * possible.length));
}
return text;
}
div.innerHTML = randomString ( 20 );
</script>
</body>
</html>
I got some interesting feedback wrt this generator and decided to provide another version which will use the crypto API
inside the browsers instead of Math.random ( );
<!DOCTYPE html>
<html>
<head><title>bored_2</title></head>
<body>
<p></p> <p></p>
<center><b><div id="OUT"></div></b></center>
<script>
var div = document.getElementById ( "OUT" );
var randomString = function(length) {
var text = "";
var possible = "ABCDEFGHIJKLMNOPQRSTUVWXYZabcdefghijklmnopqrstuvwxyz0123456789";
var cryp = new Uint8Array ( possible.length );
var rand = getRandomValues ( cryp );
for ( var i = 0; i < length; i++ ) {
text += possible.charAt ( rand[i] % possible.length );
}
return text;
}
getRandomValues = function ( buf ) {
if (!(buf instanceof Uint8Array)) {
throw new Error('Invalid type: buf not an Uint8Array');
}
if (typeof window !== 'undefined' && window.crypto && window.crypto.getRandomValues) {
window.crypto.getRandomValues(buf);
} else if (typeof window !== 'undefined' && typeof window.msCrypto === 'object' && typeof window.msCrypto.getRandomValues === 'function') {
window.msCrypto.getRandomValues(buf);
} else if (nodeCrypto) {
var bytes = nodeCrypto.randomBytes(buf.length);
buf.set(bytes);
} else if (this.randomBuffer.buffer) {
this.randomBuffer.get(buf);
} else {
throw new Error('No secure random number generator available.');
}
return buf;
}
div.innerHTML = randomString ( 20 );
</script>
</body>
</html>
Santas trip
Want to move Santa across your web page to celebrate the season or have a selfie take a trip over your web page …
Here is a fun snippet to achieve that.
<!DOCTYPE html>
<html>
<head><title>bored_3</title></head>
<body bgcolor="black">
  <img src="flying.gif" id="sleigh" style="position: absolute" />
  <audio src="bells.mp3" autoplay loop></audio>
<script>
  var img = document.getElementById ( "sleigh" );
  var left = 0;
  setInterval ( function ( ) {
    left += 3;
    img.style.left = left+"px";
    if ( left > window.innerWidth )
         left = -400;
  }, 100 );
</script>
</body>
</html>
Calculator
Still don’t know what to do ?
Have you ever wondered what your monthly mortgage rate would be like if you change the interest rate or the length of the loan ?
Or are you looking for a simple tip calculator. This snippet is using evil-eval to accomplish this task.
<!DOCTYPE html>
<html>
<head><title>bored_4</title>
    <script>
      function calc ( )  {
        var out = document.getElementById ( "OUT" );
        var txt = document.getElementById ( "eq" );
        var res = eval ( txt.value );
        out.innerHTML = res+"";
      }
    </script>
</head>
<body>
  <form>
    <input type="text" id="eq" value='var r=5.00, N=12*15, P=100000; var R=r/12/100; var M=R/(1-(1+R) ** -N ) * P; P+"@"+r+"% = "+M' size="70" \>
    <input type="button" value="Calculate" onclick="calc();" \>
  </form>
<p><b><div id="OUT"> -- VALUE --</div></b>
</body>
</html>
Polar Clock
Want to know what tmie it is but you wnat to realy try to use as much brain power as possible
Try the Polar Clock. A fun way to display time.
So now that you know what to do it should be easy to take some of these suggestions and run with it. If nothing else you can find plenty more on gihub.com to help you kill off some of your time.
Sooner or later all web developer will have to create a Login form for one of their projects. You can find a lot of sample code and frameworks out there. In fact this is one of those times where you end up in information overload. There are millions of options but which one to pick ?
QooxDoo is a great framework to write complex web applications which acts and feels like a standard windows client. These so called SPAs ( Single Page Applications ) are a great way to create a valuable presence online and to offer your customers a very special treat.
But is QooxDoo flexible enough to build a stunning login form with it ?
I found that QooxDoo and php go together like peanut butter and jelly. And yes you can also use a RESTFul API to achieve the same however using PHP will offer you one advantage over E.g. a NodeJS based back-end. With most shared hosting services you will not be able to use NodeJS.
Form and Function:
So what are we looking for in a login form ? We want a nice and clean looking interface and we want to have the ability to
Login
Sign Up
Recover password
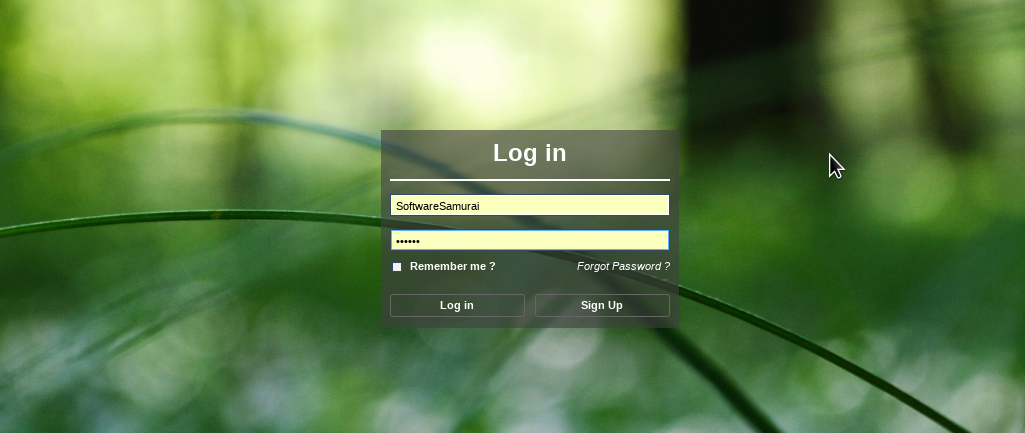
So we are actually looking at three different forms and not just a single one. three Login forms
That serves me well
For the PHP back-end I chose a single user class which I found on Github because it keeps things simple enough while at the same time offering some basic type of security. There are plenty of other options for the back-end available and you can shoe-horn any back-end into this solution really.
The PHP code was adjusted a bit and I added the code in here for your convenience. You can also download the PHP code from the following link Secure-User-Login-And-Authentication-Class
Here is the code which I added. Obviously in a real environment you want to separate this code out into its own file ( or files ).
// Simple input handling.
// Please note that no user input validation is done
$auth = new userAuth;
$type = $_GET['type'];
$name = $_GET['username'];
$pass = $_GET['password'];
$email= $_GET['email'];
$remember = $GET['remember'];
switch ( $type )  {
  case "login":  echo $auth->user_login  ( $name, $pass, $remember ) ? "true" : "false"; break;
  case "logout": echo $auth->user_logout ( ) ? "true" : "false"; break;
  case "forgot": echo $auth->forgot_password ( $email ) ? "true" : "false"; break;
  case "signup": echo $auth->create_user ( $name, $pass, $email, $remember ) ? "true" : "false"; break;
  case "check":  echo $auth->is_logged_in ( ) ? "true" : "false"; break;
  case "newDB":  echo $auth->create_user_table ( ) ? "true" : "false"; break;
  default: echo "Bad type"; break;
}
Now since we are going to use Ajax calls to the backend please keep in mind that any additional request to the backend ( E.g. like to display user data ) must be secured on the server side. You cannot rely on any security checks on the client side.
Login Form
In this post I want to mostly focus on the front-end part of the Login Form. Using QooxDoo to build the UI will require a few tweaks to the look and feel of the widgets in here.
I could have gone and created new styles following the qooxdoo way and I could have also created the LoginForm using the standard generate.py server side script. However I chose to use a functional complete, minified, qooxdoo library instead to bootstrap this application.
<!DOCTYPE html>
<html>
<head>
    <title>login</title>
    <meta charset="utf-8">
    <meta name="Author" CONTENT="SoftwareSamurai">
    <meta name="Description" CONTENT="login" />
    <meta name="Keywords" CONTENT="some keywords" />
    <meta name="Classification" CONTENT="Klassifizierung">
    <script type="text/javascript" src="script/qx-6.0.0a.min.js"></script>
    <script type="text/javascript" src="LoginWindow.js"></script>
    <script type="text/javascript" src="SignupWindow.js"></script>
    <script type="text/javascript" src="ForgotWindow.js"></script>
    <script type="text/javascript" src="ApplicationWindow.js"></script>
</head>
<body>
  <script type="text/javascript">
    qx.Class.define ( "LoginWindow.Application", {
      extend : qx.application.Standalone,
      members: {
        main : function ( )  {
          this.base ( arguments );
          if ( qx.core.Environment.get ( "qx.debug" ) )  {
            qx.log.appender.Native;
            qx.log.appender.Console;
          }
          var root = this.getRoot ( );
          var decorator = new qx.ui.decoration.Decorator ( );
          decorator.setBackgroundImage ( "background.jpg" );
          decorator.setBackgroundRepeat( "scale" );
          this.getRoot ( ).setDecorator( decorator );
          this.rpc ( "type=check", function ( success )  {
            var win = null;
            if ( success )
              win = new ao.apps.users.SoftwareSamurai.ApplicationWindow ( );
            else
              win = new ao.apps.users.SoftwareSamurai.LoginWindow ( );
            win.show ( );
          },this );
        },
        rpc : function ( str, cb, ctx )  {
          var rpc = new qx.io.request.Xhr ( "user.class.php?"+str );
          rpc.addListener ( "success", function ( e, x, y ) {
             var req = e.getTarget ( );
             var rsp = req.getResponse ( );
             cb.call ( ctx, ( rsp === "true" ) );
          }, this );
          rpc.send ( );
        }
      }
    } );
    qx.core.Environment.add ( "qx.application", "LoginWindow.Application" );
  </script>
</body>
</html>
Using this approach has the advantage of being able to rapidly develop your application and then use the standard QooxDoo tools to compile and minify once you are sure you have all you want.
For a standard QooxDoo application you have the Application.js file, which I have folded into this html file.
So lets go though this code above: Line 10 : Here we load the complete qooxdoo library in a minified version. Linew 11 – 14 : These are the classes we are going to create today. Line 18 : Every QooxDoo application has to be derived off of qx.application.Standalone. Line 21 : This is the main entry function which is called once the application is completely loadedinto the browser and the widgets are initialized. Line 28 – 31 : In order to set the background image for the complete window we have to set the applications decorator. Line 32 – 39: These lines of code do call the backend and if the user is already logged in, then we display the main application window, otherwise we display the login form. Line 41 – 49 : This function will call the backend form ( “user.class.php ), and call the supplied callback function back in the supplied context ( object ). Line 52 : In order to create a qooxdoo application you have to set this variable to allow the framework to instantiate the appropriate class as the main application.
Log me in Scotty
If you are not currently already logged in you will create a new instance of LoginWindow. So lets take a look at this class.
One word upfront though first. All three classes are very similar in structure, so I will only talk about the LoginWindow here. You can find the code of the other classes following the link below this blog.
The first thing we have to take care of is to create the actual widgets.
Line 1: We define the class name following the qooxdoo naming convention. Line 3: Instead of creating a Window with a title etc we simply create a Container Line 4 – 14: The constructor takes care of the initialization. I want to point out qx.bom.Document.getHeight ( ) which will give you the size of the browser window. Line 11 – 13: Getting the applications root window and adding the LoginWindow to the root. Line 19 – 21: The semi transparent background. If we would set the opacity of the actual LoginWindow we would also create the buttons and the text with the set opacity which is not wanted. Line 46 – 50: For the checkbox we want to change the text color to white. In order to achieve this we have to get the actual Label object, and then use plain HTML to change the color. Line 52 – 67: Here we build a widget which behaves like a HTML link. There are many ways this could be done, so consider this one of the solutions. Also please note that I am using a Atom instead of a Button object here. Line 69 – 77: Finally we create the Log In and Sign up buttons. This is done using a function which takes in the required attributes and a callback function.
Lets inspect how we create the buttons and their custom looks.
Line 2 – 5 : The first few lines of the _createBtn function we create a button and then change the text color to white. Line 6 – 8 : The first time the button is rendered we will go ahead and change the background color. If we call the function before the button is visible, then the DOM element would be null. Line 9 – 14 : These two callback function handle the case when the mouse gets into and out of the widget. In this case we are going to change the background color of the button. Line 15 – 17 : We handle the execute event and are going to call the registered function back. Please take note of the way I implemented the callback, which will retain the context ( object ) inside the function. In object oriented programming you want to always use and handle the data inside an object so it is important to remain in the appropriate context. Line 20 – 28 : In order to set the buttons background color we have to modify the DOM element directly. Please remember that this is not the way I would change the style of a button if I wanted to use it throughout the rest of the application. This is a quick way to get to change the gradient background color.
… and action.
The following functions handle the button action.
    forgot : function ( )  {
      var forgot = new ao.apps.users.SoftwareSamurai.ForgotWindow ( );
      forgot.show  ( );
      this.destroy ( );
    },
    login : function ( )  {
      var name = this._name.getValue ( );
      var pass = this._pass.getValue ( );
      var remember = this._remember.getValue ( );
      if ( name.length < 1 || pass.length < 1 )  {
        alert ( this.tr ( "Please provie username and password" ) );
        return;
      }

      var str = "type=login";
      str += "&username="+name;
      str += "&password="+pass;
      str += "&remember="+remember;
      var app = qx.core.Init.getApplication ( );
      app.rpc ( str, function ( success ) {
        var win = null;
        if ( success )  {
          win = new ao.apps.users.SoftwareSamurai.ApplicationWindow ( );
          win.show ( );
          this.destroy ( );
        }
        else  {
          alert ( this.tr ( "Could not log in." ) );
        }
      }, this );
    },
    signup : function ( )  {
      var signup = new ao.apps.users.SoftwareSamurai.SignupWindow ( );
      signup.show  ( );
      this.destroy ( );
    },
Line 1 – 5 : The forgot function will create and display the ForgotWindow form and destroy the Login form. Line 6 – 13 : we retrieve the values the user entered and do some basic sanity checking. Line 15 – 18 : Here we build the query string to send to the back-end. Line 19 – 20 : We get the application object to invoke the rpc function. Line 21 – 29 : Once the server returns we check if we were successful in logging in. If yes, then we hide the Login form and start the main ApplicationWindow. Line 32 – 36 : The signup function will create and display the SignupWindow form and destroy the Login form.
Let’s wrap it up
Congratulations, you have done it. You are now able to build your own complex web applications on a shared hosting service, such as Dreamhost with as little as $8,- per month.
.
Resources
Live sample
Create a stunning login form using QooxDoo and PHP
Note: try user “test” and password “abc123” or create a new user.
I also created a video on creating a stunning login form using QooxDoo, which you can find here …
Please follow this link here … to play with the code.
One day I asked myself the question : “Is it is possible to make a game in WebGL using the A-Frame framework in 5 minutes or less ?”.
Thinking through this a bit I concluded, that one of the things which take up the most time when you make a game is to create the models, textures, graphics, sound, and of course the game play.
If you take this out of the equation, and you have the data and game play already set, then it should be possible to create a game in a very short time period indeed. However would it be possible to do it in 5 minutes or less ?
Let’s find out.
Gameplay
The first thing to decide when you make a game is the actual game play. I like arcade games which do not require an extensive AI to handle the enemy’s movement. A simple random number generator, in general, and some physics is sufficient for those types of games.
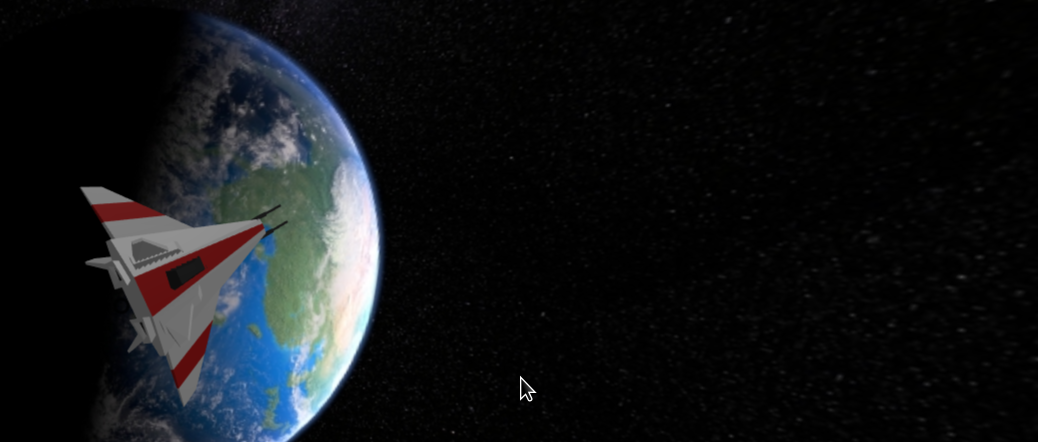
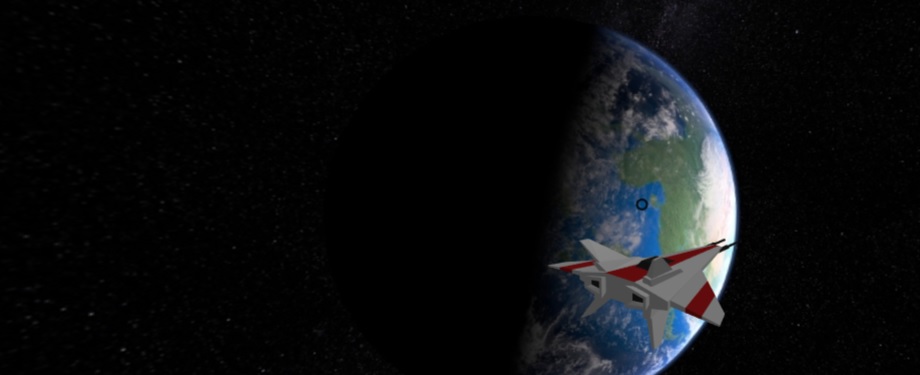
So this time I want to create a game which is a basic shooter however wrapped around a globe. I do not intend in using a real physics engine, such as CANNON.js, as that would be overkill.
The user can change the rotation of his vessel around the globe and he can also adjust the tilt to hit ( or miss ) his target.
This is a simple enough game and can be extended ad infinity with better aliens, moving targets, better sound, graphics, etc however the 5 minute deadline is keeping us within a reasonable limit.
Model, Graphics and audio:
Since these things are unrelated to the actual coding I decided to take these out of the equation and instead use models, graphics, and audio I collected online.
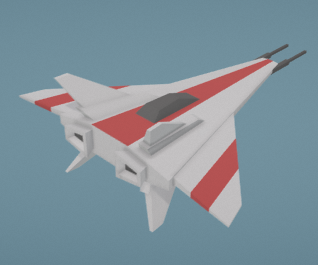
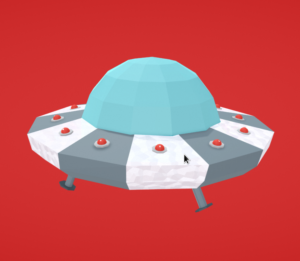
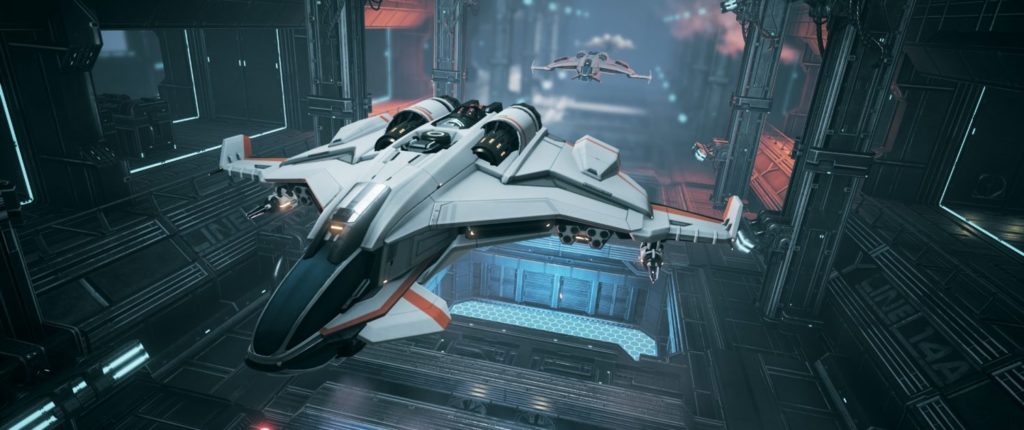
Thankfully there are plenty of online stores for any type of 3D model available. I found this spaceship from Liz Reddington and the UFO by Eric Smith
Spaceship
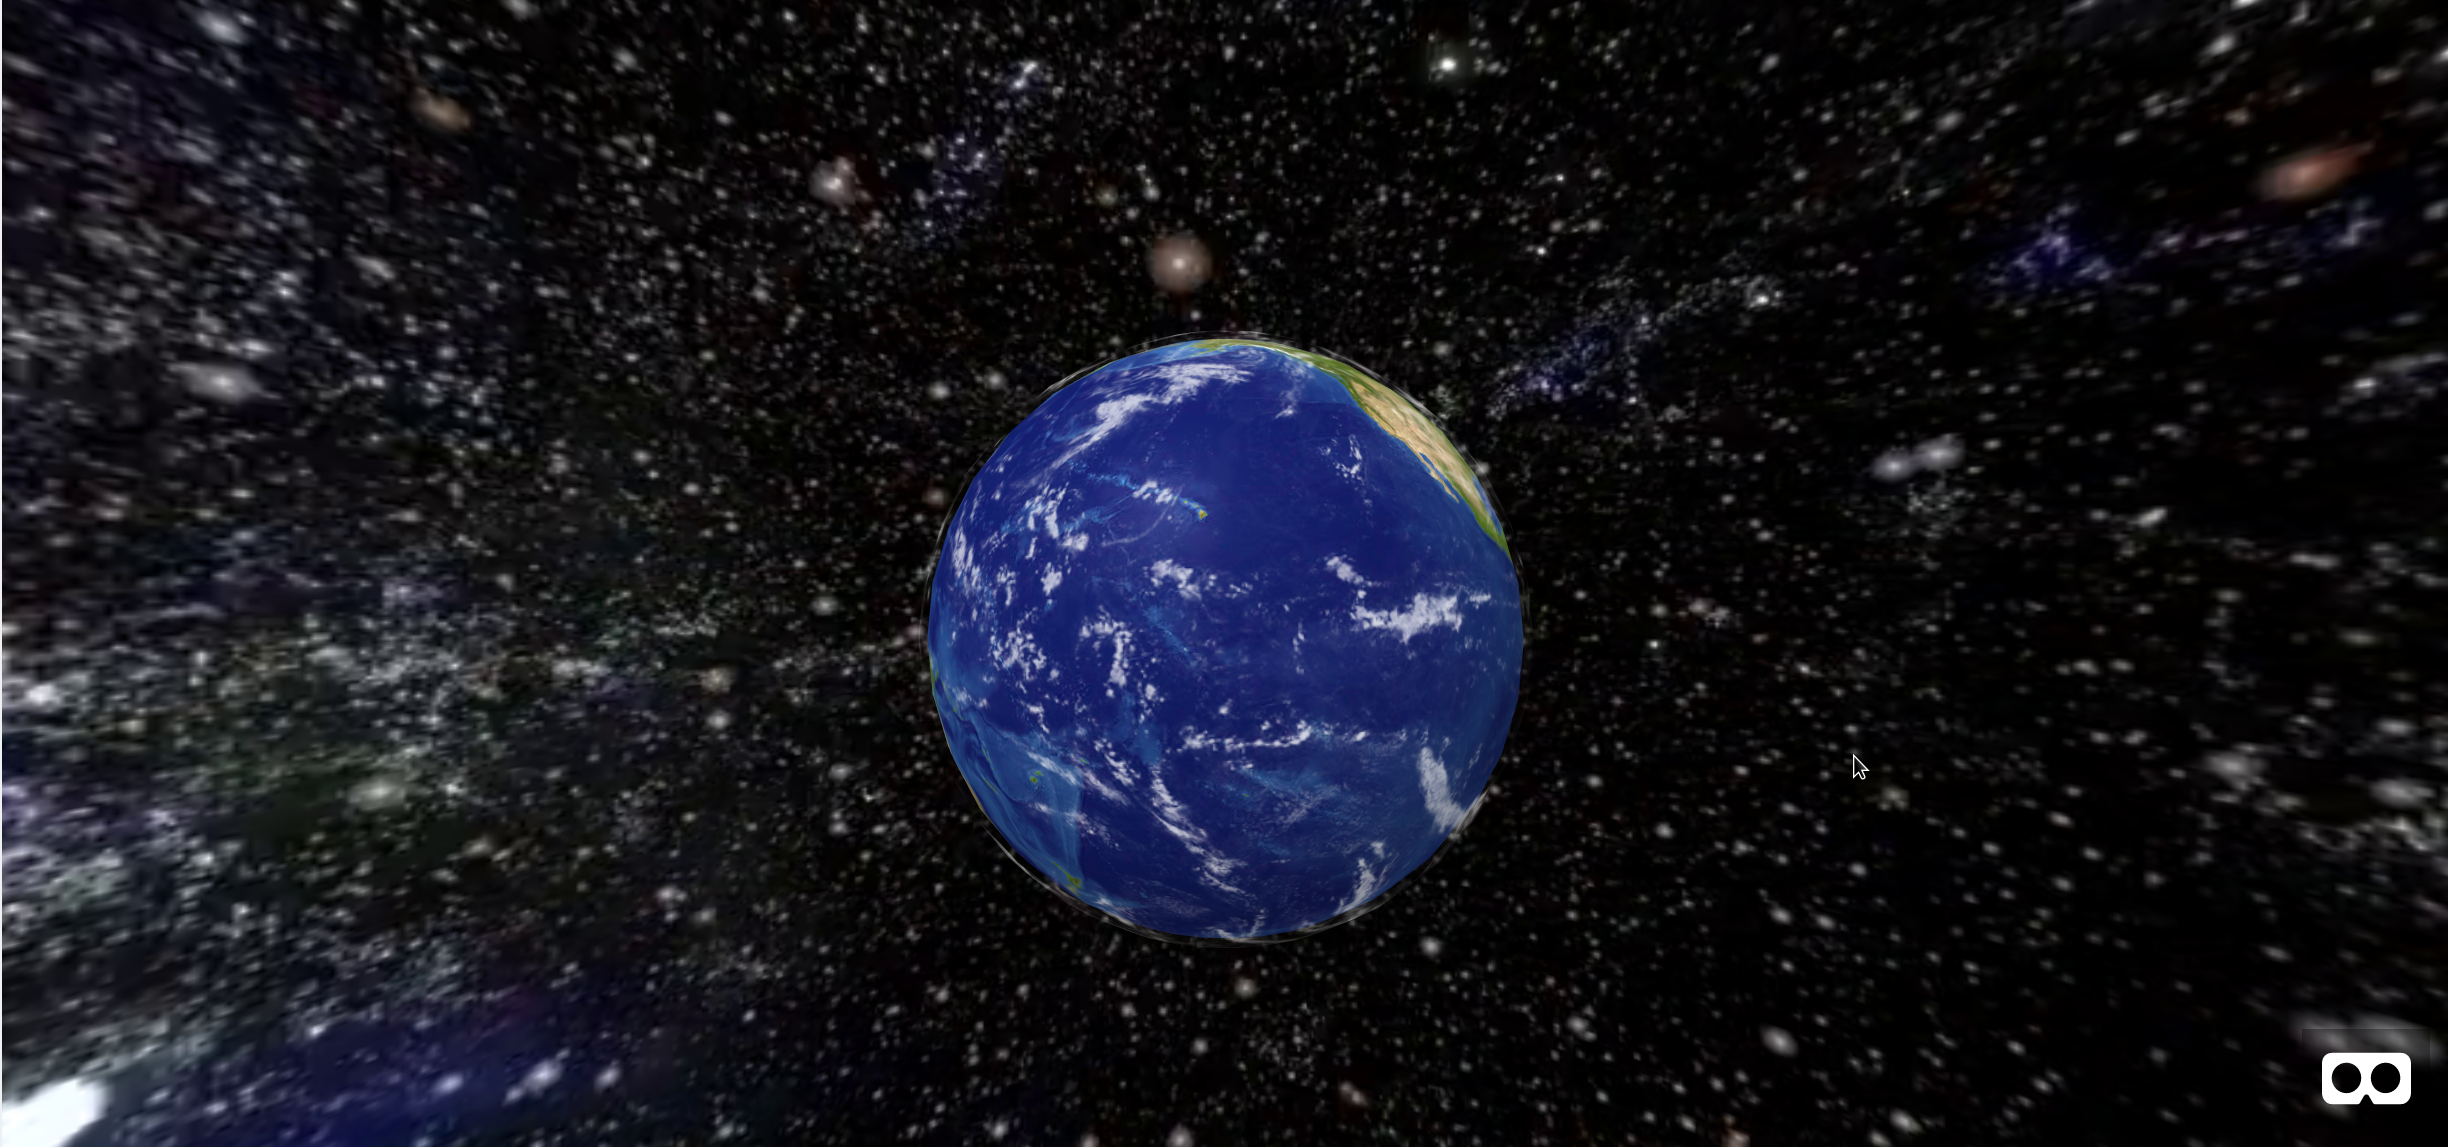
The same is true for the texture I use for earth. you can find these easily online searching for texture earth. I picked one without clouds because I wanted to have a separate layer for clouds.
I found some ambient background music through FreeMusicArchive from Lobo Loco
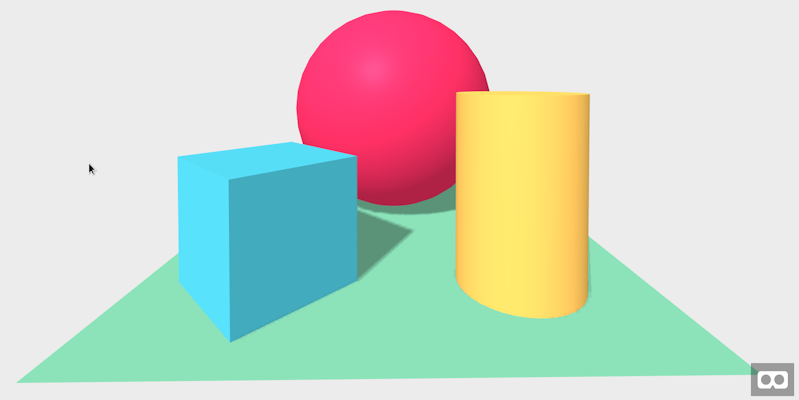
I chose to create a welcome scene because I had the template for it around from my previous video on 360° image web app and it also allowed me to place a Object inside the AFrame scene. It is always a nice touch when you make a game.
Using “ctrl” + “Alt” + “i”, I had to tweak the position and rotation of the camera, and the model to make this scene picture perfect. Although it took some time, it gave me the opportunity to use the graphical inspector and to figure out how to debug a 3D scene.
Now with the above I have completed the pre-requisite and am now starting the clock. The main scene is a spinning globe with a starry background. I had a lot of the scaffolding from the initial sample available and all I had to do is to create an additional sphere which I gave the cloud layer which had a slightly increased size as compared to earths radius.
The Animation – tags will take care of the rotation for the earth-texture and cloud-texture so I don’t have to worry about that part anymore.
You cannot make a game without a few assets in place. I needed the spaceship, the ufo, the audio, as well as the bullet in the scene. So I added those in to the assets and the scene.
This seems like a lot of code but it is mostly cut-and-paste and some size adjustments. This turned out to be straight forward as I have learned how to use the visual inspector previously.
All actual objects are encapsulated in another, outer a-entity. The reason for this is that we want to place the objects outside of earths radius by adjusting the position and then use the rotation on the outer entity for the game play.
The drag-rotate-component part on the Spaceship allows us to use the mouse to move the spaceship rotation around the globe as well as the tilt of the spaceship.
When you make a game you have to be able to detect when things collide. In order to have A-Frame detect the collision of two objects, I utilized the Sphere collider which was as simple as adding sphere-collider=”objects: .ufo; radius: 0.5″ to the bullet – object.
The coding part
With the scene complete and all objects in place I could go ahead and customize the ‘drag-rotate-component’ component.
Here again we have a lot of cut-and-paste code which takes care of binding the mouse events to their callback functions and initializing the objects as well as starting the background audio.
Please note the way the collision is detected for the sphere collider this.ufo.addEventListener ( ‘hit’, this.OnCollission.bind ( this ) );.
Finally, We are randomly placing the UFO into the scene in the last line of the initialization function. However we have to make sure the user can see it ( so it can’t be placed behind earth ).
Lets take care of the callback functions we defined here first which build the core of the game.
      OnCollission  : function ( e )  {
        e.preventDefault ( );
        this.stopShot ( );
        this.ufoExplode ( );
      },
      OnDocumentKeyDown : function ( e )  {
        if ( e.keyCode === 32 ) { // spacebar
          e.preventDefault ( );
          this.shoot ( );
        }
      },
      OnDocumentMouseDown : function ( event )  {
        this.ifMouseDown = true;
        this.x_cord = event.clientX;
        this.y_cord = event.clientY;
      },
      OnDocumentMouseUp : function ( )  {
        this.ifMouseDown = false;
      },
      OnDocumentMouseMove : function ( event )  {
        if ( this.ifMouseDown )  {
          var temp_x = event.clientX-this.x_cord;
          var temp_y = event.clientY-this.y_cord;
          if ( Math.abs ( temp_y ) < Math.abs ( temp_x ) )  {
            var  rotY = temp_x*this.data.speed/300;
            this.rotY = this.el.object3D.rotateY ( rotY ).rotation.y;
            this.bullet.object3D.rotateY( rotY );
          }
          else {
            var  rotX = temp_y*this.data.speed/500;
            if ( rotX > 0 && this.rotX === -1.0 )
                return;
            if ( rotX < 0 && this.rotX === -1.5 )
                return;
            this.rotX = this.ship.object3D.rotateX ( rotX ).rotation.x;
            if ( this.rotX > -1.0 )
                 this.rotX = -1.0;
            if ( this.rotX < -1.5 )
                 this.rotX = -1.5;
          }
          this.x_cord = event.clientX;
          this.y_cord = event.clientY;
        }
      }
The main function here if the OnDocumentMouseMove as expected since we have to calculate the new location and angle of the spaceship. It took some experimenting to get the values for the tilt right but overall this was not too painful.
just shoot me now
Okay so here is the interesting part. We want to make a game where we can shoot at something. For that we will have to implement a few functions now as well.
The lockAndLoad function will place the bullet back in the spaceships core. animate will request the next animation frame until we have either detected a collision ( see OnCollission ) or until the bullet falls into earth. shoot and stopShot should be self explanatory.
      lockAndLoad : function ( )  {
        var  rotY = this.rotY * 180.0/Math.PI;
        this.beam.object3D.position.x = -11.0;
        this.bullet.object3D.rotation.z = 0.0;
        this.bullet.object3D.rotation.order = "ZYX";
        this.anim.setAttribute ( "from", "0 "+rotY+" 0" );
        this.anim.setAttribute ( "to", "0 "+rotY+" -360" );
        this.anim.data.from="0 "+rotY+" 0";
        this.anim.data.to="0 "+rotY+" -360";
      },
      shoot : function ( )  {
        document.getElementById ( "shoot-audio" ).play ( );
        this.lockAndLoad ( );
        this.beam.emit ( "startAnimation" );
        this.animate ( );
      },
      stopShot : function ( )  {
        this.beam.emit ( "endAnimation" );
        this.lockAndLoad ( );
        // Stop animation
        this.beam.object3D.position.x = 0.0;
      },
      animate : function ( )  {
        var self = this;
        if ( this.beam.object3D.position.x > -7.5 )  {
          this.stopShot ( );
          return;
        }
        // this.rotX defines the speed of the descend
        // this.rotX in range of [-1.5 .. -1.0]
        var delta = (this.rotX+1.5) * 2; // Normalized value [0 .. 1]
        delta = 0.01 + delta* 0.1;

        this.beam.object3D.position.x += delta;
        function handle ( )  {
           self.animate ( );
        }
        window.requestAnimationFrame( handle );
      }
The only remaining function is to handle the case when the UFO is hit.
Cool so if you point your browser to your shiny new game you can actually spend some relaxing time with this.
You can also use this code and expand on it and make a game which has multi-player capabilities, using E.g. WebRTC for browser-to-browser communication. Then one player could navigate the UFO, the other could navigate the spaceship. Or you can add in an explosion or you can change the camera view or you can ….
Resources
Find the video for this tutorial below
3D Game in action
I also created a video building this 3D game, which you can find here …
Please follow this link here … to play with the code.
The possibilities are endless …
Since we have mastered 3D and the basics for gameplay it is now up to your imagination to get all out …
In the last post we created a 360 degree image viewer in plain old javascript. we used the A-Frame framework and integrated the prev and next controls into the view itself.
This is a perfect solution if you want to display a series of 360 degree images ad you can hard-code the image locations in code. You can also modify the previous code and dynamically load images using PHP, NodeJS or any other server back-end.
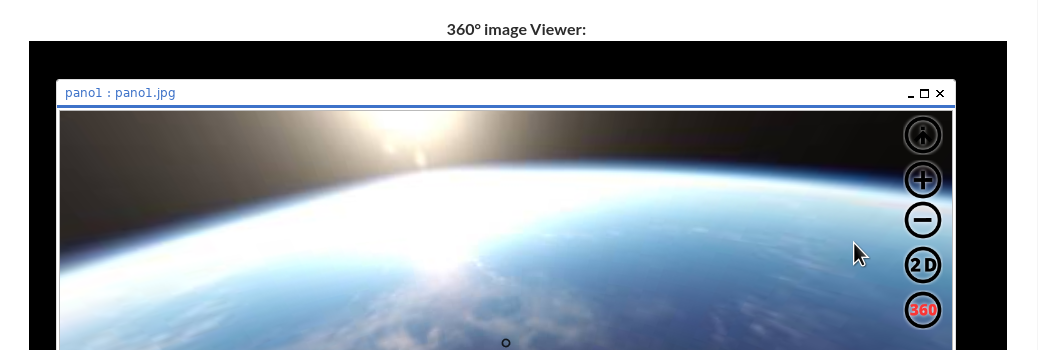
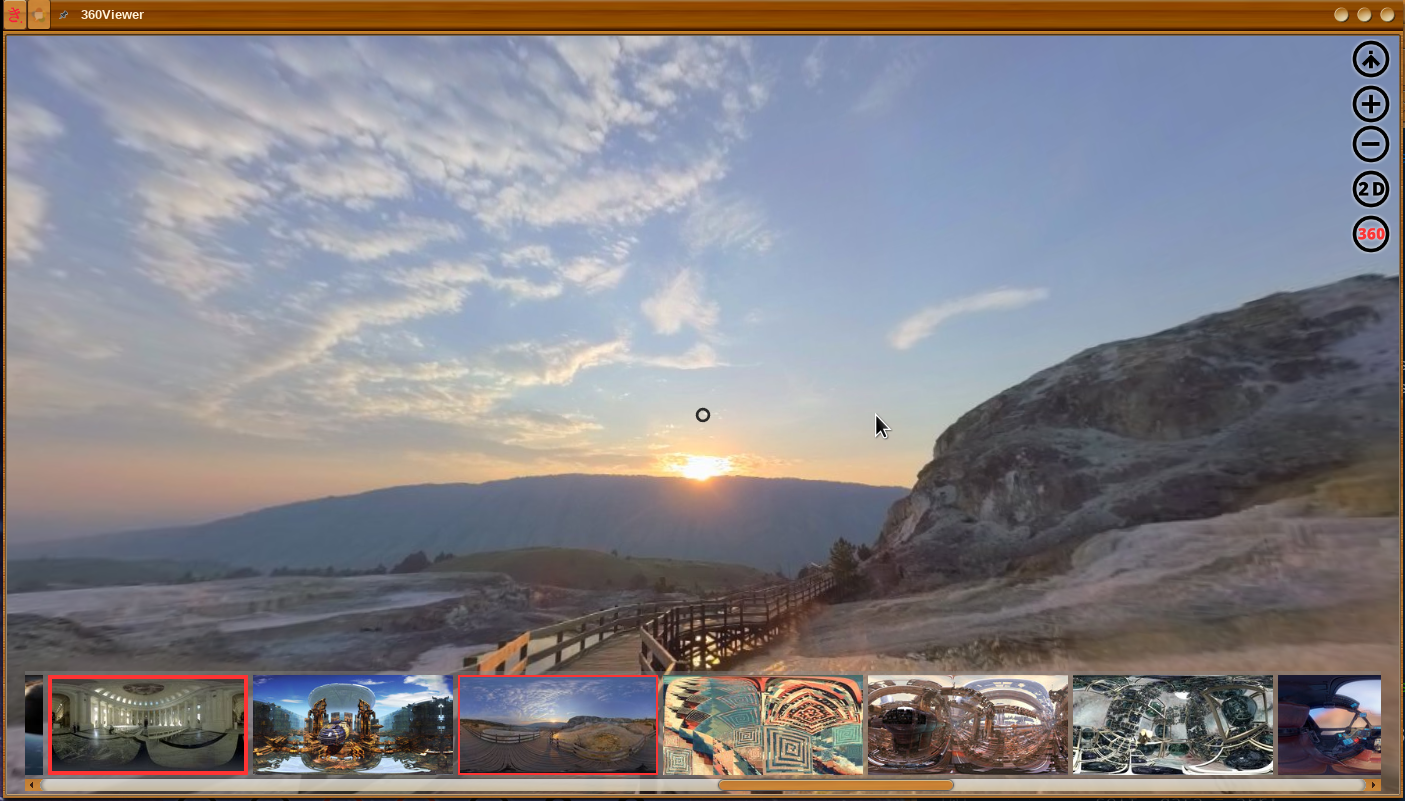
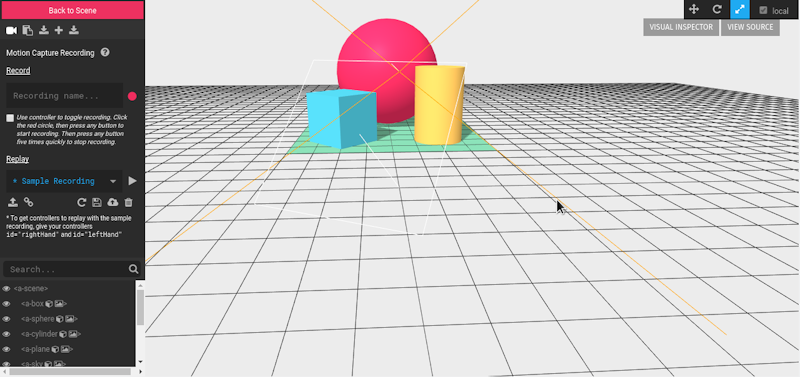
In this, the second part, of episode 5 we are actually going ahead and replace the in-frame controls with some overlay controls using the QooxDoo javascript libraries. Below is a screenshot of the final app.
360 degree Viewer App
Where do we get started :
I want to take you through the process of creating a new application from scratch. This process is true for smaller projects as well as for larger ones. It is valid for JavaScript, C++, Python, go and about any language you are using.
This process also holds true if you are working on larger commercial applications except that instead of writing actual code, the steps described here are documented in a design document, requirements-document, or captured in a use-case document.
I firmly believe that anyone can program and anyone can learn how to do it by simply following this pattern. One point to remember is to keep it simple, clean and small. the number of lines of code in your program should be a reflection of the functionality.
A lot of the code you will see in this post is the result of “I want X to happen with control Y“. In fact the first 200 lines of code build and animate the UI.
Lets go then…
When I started I knew that I wanted to create an app which has
Forward and backward controls
Can display images on a 2D canvas as well as in 360 degree
I wanted to be able to view thumbnails of all ‘selected’ images
How do you design a UI with almost no existing requirements ?
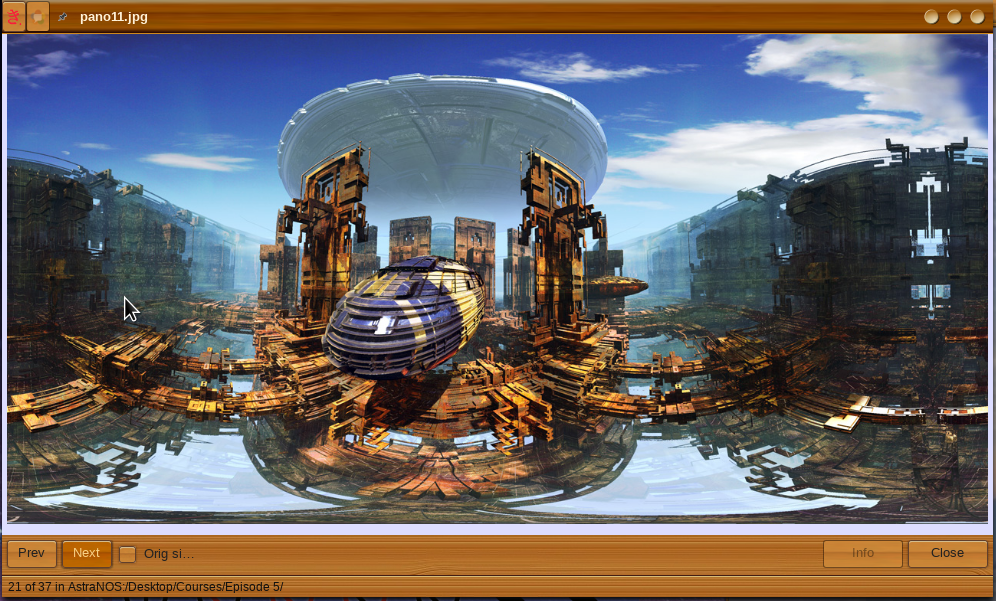
First I looked at the navigation buttons. I simply looked for prev and next button images. I decided to go with arrows as I could not find anything else I liked and simplicity is king. However I wanted to have a nicer interface than the ImageViewer. Image Viewer
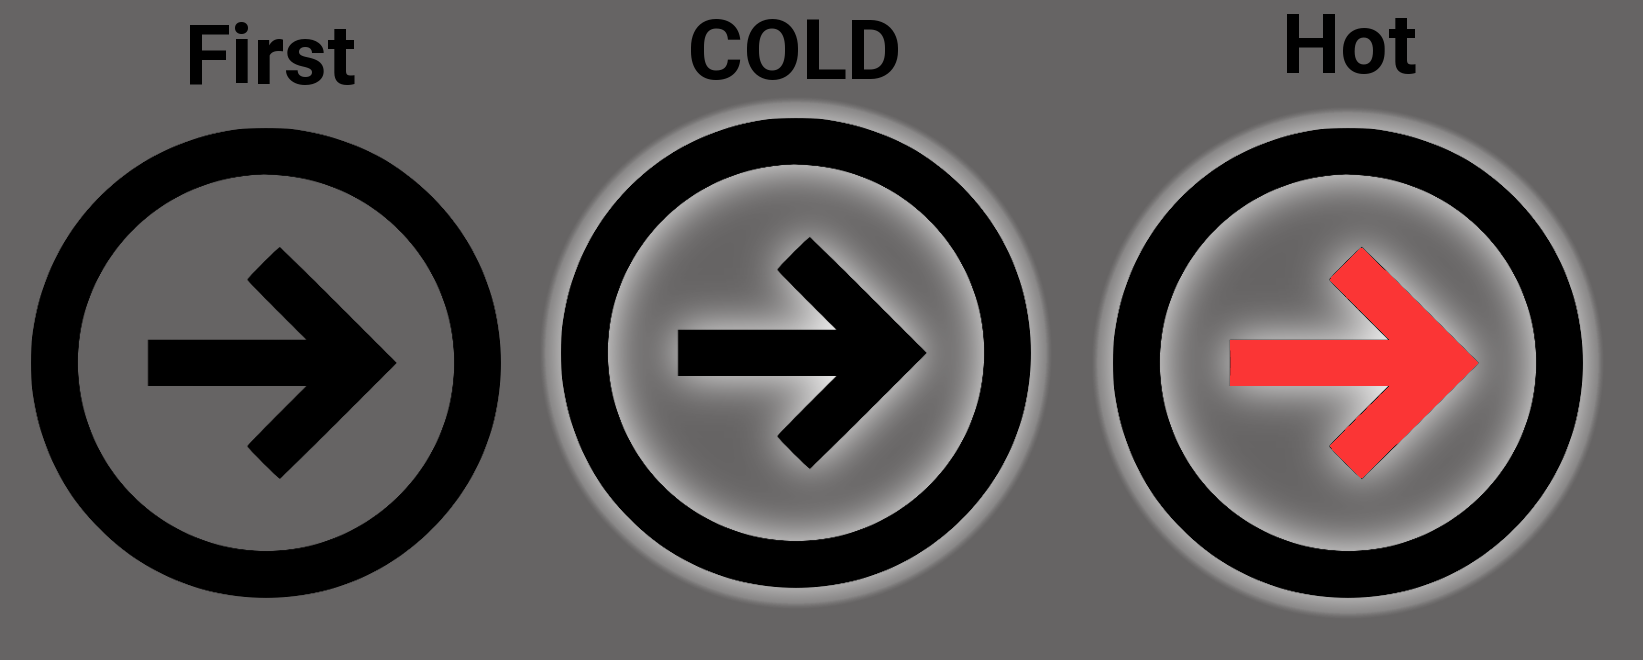
So instead of using a button object, I created a qx.ui.basic.Image object and added listener for the mouseenter, mouseout, and click events. Though now I needed a cold, and a hot image to indicate that there is something the user can interact with. Hmmm and come to think of it, the simple black and transparent arrow will not work on a black background. So back to the Gimp. Below is one of the eight buttons I created this way.
Button Design
The javascript code to handle image buttons looks as follows:
     _createImgButton : function ( cold, hot, attr )  {
      var btn = new qx.ui.basic.Image ( this._path+cold+".png" );
      btn.set ( { scale: true, width: 40, height: 40 } );
      btn.hot = hot; btn.cold = cold;
      btn.addListener  ( "mouseover", function ( e )  {
         this._audio.play ( );
         btn.setSource ( this._path+btn.hot+".png" );
      }, this );
      btn.addListener  ( "mouseout", function ( e )  {
         btn.setSource ( this._path+btn.cold+".png" );
      }, this );
      this.add ( btn, attr );
      return btn;
    }
With this fragment in place we can now go ahead and build the interface.
A few notes are in order here though.
The 360 Viewer is handled in an iframe to avoid global namespace collusion in the main application.
Switching between a 2D image display and the 360 Viewer is a simple game of hide and show
We use the touchstart rather then the click event because the A-Frame library does not forward click events anymore.
Take a closer look at back, scroll, and lyt. Those will handle the preview strip at the bottom
Finally the this._info button will show / hide the topRightMenu.
Congratulations, at this point you have all the controls in place. However a modern interface requires some bling.
Thankfully QooxDoo makes this easy as well.
Animating to see
Burried deep within the API documentation is a little nugget which allows you to animate items around without a lot of code.
Here is what the code does. this._back and this._scroll are the controls for the image strip at the bottom. All other controls are image buttons. The core of the animate function is the qx.bom.element.Animation.animate ( dom, anim ); call, which takes the dom element and the animation attributes in form of the anim – object.
The most important information which we have to take care of are the key frames. those keyframes define the attribute values for the range of 0% ( beginning of the animation ) and 100% ( end of animation ). The system will take care of the intermediate positions.
Note: since we directly modify the dom element we will also have to tell the QooxDoo framework of the ‘layout change’ That is the reason we itm.setLayoutProperties ( { right: end } );. Without these calls QooxDoos’ layout engine would re-position the dom elements to its original position at the next refresh.
More JavaScript, I WANT MORE !!!!
mouseOver, and mouseOut is triggered by the preview strip at the bottom. It is like the taskbar which will auto-hide in windows.
switch2D, and switch360 trigger the hide and show spiel when we swich the view. Really nothing to it but powerful nevertheless.
_toggleBtn switches the hot, and cold state of a button. The icons have been named in a way where a “-1” appended to the name indicates an active position E.g. prev.png and prev-1.png
200 Lines Of Code Great you are sticking with me here. I know it looks like a lot of code but see what we did thus far was simply to create a bunch of controls and took care of the way they are being displayed and animated.
At this point there are only two missing pieces to complete this application.
Loading the image data and displaying it in the preview-strip.
Displaying the active image in the main area
Faking it
In order to continue the client side code we will first use a fake response from a backend. Stricktly speaking we only need the image, and possibly a smaller version of it in form of a thumbnail. The code below will do just fine for now.
    loadImages : function ( )  {
      // Testing functionality
      var arr = [];
      for ( var t=0; t<200; t++ )  {
        var i = t*2;
        arr.push ( { name: "pano"+i,  src: "pano1.jpg", thumb: null, text: "Space Earth" } );
        arr.push ( { name: "pano"+i+1,src: "pano2.jpg", thumb: null, text: "Mountain Water" } );
      }
      this._data = arr;
      var idx, cnt = 0;
      for ( idx in arr )  {
        this._addImage ( arr[idx], cnt++ );
      }
    },
Once we have the backend in place we will replace the above with :
    loadImages : function ( )  {
      // E.g. this._origSource = "AstraNOS:/Desktop/Courses/Episode 5/prev.png";
      var parms = [ this._origSource ];
      if ( ! this._rpc )
        this._rpc = new qx.io.remote.Rpc ( "services.php", "apps.system.360Viewer.360Viewer" );
      this._rpc.setTimeout ( 10000 ); // 10 seconds wait
      this._rpc.setCrossDomain ( false );
      var self = this;
      this._rpc.callAsync ( function ( arr, exception )  {
        if ( exception === null )  {
          self._data = arr;
          var idx, cnt = 0;
          for ( idx in arr )  {
            self._addImage ( arr[idx], cnt++ );
          }
          self._curr = 0;
          self.displayImage ( );
        }
        else  {
          alert ( "Something went wrong : " + exception );
        }
      }, "getImageList", parms );
    },
So there are a few things in the above function we should talk about Line 02 : this._origSource is the expected input for the backend call. AstraNOS indicates that it is ‘locally’ stored and not on E.g. DropBox. Then we want to point to a image from the system. It is set when the user opens the application. Line 03 : parms contains an array of attributes which is passed into the function on the server side. Lines 05 – 09 : Create the RPC object. I will write another blog post soon talking about the php backend. In short your root directory on the server contains services.php, which calls a php function in class “class_360Viewer” called “getImageList” with attributes “parms”. Lines 10 – 21 : Here we handle the callback, receive the data from the server and add a single image per array entry to the preview-strip.
and here is the _addImage function.
    _addImage : function ( itm, idx )  {
      var thumb = itm.thumb ? itm.thumb : itm.src;
      var icon  = new qx.ui.basic.Image ( );
      icon._idx = idx;
      qx.io.ImageLoader.load ( thumb, function ( src )  {
        icon.setSource ( src );
        icon.set ( { padding: 0, scale: true, maxWidth: 200, maxHeight: 100, width: 200, height: 100, backgroundColor: "#FF3333" } );
        icon.addListener ( "mouseover", function ( e ) {
           this._audio.play ( );
           icon.set ( { padding: 4 } );
        }, this );
        icon.addListener ( "mouseout", function ( e ) {
           var pad = this._curr === icon._idx ? 2 : 0;
           icon.set ( { padding: pad } );
        }, this );
        icon.addListener ( "touchstart", function ( e ) {
           this._curr = icon._idx;
           this.displayImage ( );
        }, this );
        this._previewStrip.add ( icon );
      }, this );
    },
Display the image already
We are almost complete. The following four functions handle the display of the image in both 2D, and 360 degree form.
getCurrentImage returns the current image either in thumbnail form or as teh full resolution image
displayImage displays the current image by first displaying the thumbnail, followed by the full sized image. This will improve usability as the thumbnail is already cached in the preview-strip.
_displayImage takes care of actually displaying the image in either 2D or 360 degree view based on the selected mode.
scaleImage this function is only required for the 2D view in order to properly fit it into the view-port of the window.
    getCurrentImage : function ( getThumb )  {
      if ( getThumb === true )
        return this._data[this._curr].thumb;
      return this._data[this._curr].src;
    },
    displayImage : function ( )  {
      if ( ! this._iframe )
        return;
      var cnt = 0, kids = this._previewStrip.getChildren ( );
      for ( var idx in kids )  {
        kids[idx].set ( { padding: 0 } );
        if ( cnt++ === this._curr )
          kids[idx].set ( { padding: 2 } );
      }
      var fname = this.getCurrentImage ( ).match(/[-_\w]+[.][\w]+$/i)[0];
      this.setCaption ( this._data[this._curr].name + " : " + fname );
      this._displayImage ( this.getCurrentImage ( true ) );
      this._displayImage ( this.getCurrentImage ( ) );
    },
    _displayImage : function ( src )  {
      if ( this._mode2D === false )  {
        var  win = this._iframe.getWindow ( );
        if ( win )
          win.changeTo ( src );
      }
      else  {
        qx.io.ImageLoader.load ( src, function ( src )  {
          var loaded= qx.io.ImageLoader.isLoaded ( src ); // Needed to make sure we have size info
          this._preview2D.setSource ( src );
          var s = qx.io.ImageLoader.getSize ( src );
          if ( typeof ( s.width ) !== "undefined" && typeof ( s.height ) !== "undefined" )
             this.scaleImage ( s.width, s.height );
        }, this );
      }
    },
    scaleImage : function ( iW, iH )  {
      var  x, y, w, h;
      if  ( this._scaleImage ) {
        var space = this._scroll2D.getInnerSize ( );
        w = space.width  - 10;
        h = space.height - 10;
        if ( iW/iH > w/h )  {
          var h1 = h;
          h = parseInt ( iH / iW * w, 10 );
          x = 5;
          y = parseInt ( ( h1 - h ) / 2, 10 ) + 0;
        }
        else  {
          var w1 = w;
          w = parseInt ( iW / iH * h, 10 );
          y = 5;
          x = parseInt ( ( w1 - w ) / 2, 10 ) + 0;
        }
      }
      else  {
        w = iW; h = iH;
        x = 0;  y = 0;
      }
      this._preview2D.setWidth  ( w );
      this._preview2D.setHeight ( h );
      this._preview2D.setLayoutProperties ( { top: y, left: x } );
    },
construct “The end”
So here is the constructor then and the resize function
qx.Class.define ( "ao.apps.users.SoftwareSamurai.360Viewer",
{
  extend : qx.ui.window.Window,
  construct : function ( ) {
    this.base ( arguments );
    this.setLayout ( new qx.ui.layout.Canvas ( ) );
    this.setLayoutProperties ( { top: 10, left: 100 } );
    this.set  ( { contentPadding: 2, opacity: 1.0, width: 1400, height: 800 } );

    this._path   = ao.prefix+"apps/users/SoftwareSamurai/";
    this._data   = [];
    this._curr   = 0;
    this._timer  = null;
    this._mode2D = false;
    this._scaleImage = true; // 2D
    this._origSource = "";   // Handling autosatrt and loading of all images in this dir

    // Buffering the putton images.
    this._imgBuff = [];
    this._audio  = new qx.bom.media.Audio ( this._path+"click.ogg" );
    this._iframe = null;
    this._isOpen = false;
    this.addListener  ( "resize", this._resize, this );
    this._buildWindow ( );
    if ( typeof ao !== "undefined" && typeof ao.desktop !== "undefined" )  {
      // Note ao.desktop is a class derived of qx.ui.desktop.Desktop ...
      ao.desktop.addWin ( this );
    }
    else  {
      var app = qx.core.BaseInit.getApplication ( );
      var root = app.getRoot ( );
      root.add ( this );
      this.show ( );
    }
    this.loadImages   ( );
  },
  _resize : function ( )  {
    if ( this._mode2D === true )
      this.displayImage ( );
  },
Phew, we went through 375 lines of code here but who is counting ?
At this point all that is left to do is to show the goods.
360° image Viewer:
I also created a video building this web app, which you can find here …
Please follow this link here … to play with the code.
Moving from 2D planar photos to 360 degree images is like jumping through the pane of glass of an image and immersing yourself in hat frame. Take your time, look around and view the wonders captured in that moment.
Today I want to teach you how to create a interactive 360 degree image viewer using plain old JavaScript with the help of A-Frame / ThreeJS and as usual you can go ahead and play with the results by following the link on the bottom.
A-Frame … say what ?
In the last episode we took some ShaderToy WebGL based shader and ported it to threejs and generated a nice animated background with this method.
A-Frame is using a XML based syntax to expose the underlying library of … you guessed it … threejs. That of course means that all features of threejs are at your convenience when using A-Frame.
This combo does not only pack 360 degree of freedom but it also allows you to place elements in 3D space, which makes for a nice combo. Below is a simple “hello World” page using A-Frame.
Also this library comes jam-packed with additional plugins and a vibrant community. Here is a link which lists some of the available tools and plugins. And then here is a weekly blog which lists all the cool things going on around A-Frame.
To say it in their own words: “A-Frame is a web framework for building virtual reality (VR) experiences. Originally from Mozilla, A-Frame was developed to be an easy but powerful way to develop VR content. As an independent open source project, A-Frame has grown to be one of the largest and most welcoming VR communities.”
Another nice feature is the visual inspector which is available in every A-Frame scene. Simply hit “ctrl” + “alt” + “i” Hello AFrame debug
360 degree Viewer:
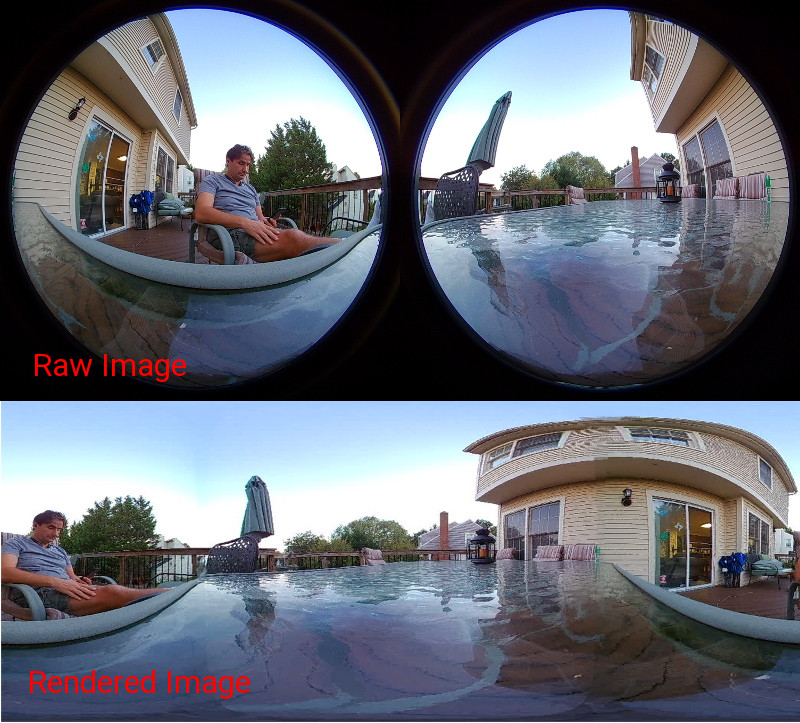
One of the things I have been playing around with lately is the Gear 360 camera from Samsung. As you can see from the image below, it has two large fish eye lenses which together capture a monoscopic 360 degree image or video.
The camera records with the two lense on a single rectangular region, in order to convert the images / videos from this raw input into a usable equirectangular view you have a couple of options at hand.
=>
The easiest would be to own a Samsung phone and then simply have the Android app export the image / video already rendered. The second option Samsung offers is an external application for Windows or Mac OSX to convert the input to its proper format.
And then finally there are third party options available ( like ) or you can get smart and create your own. For brevity I went with option number one which also means that I have not a lot to say about this process in this post.
The takeaway here is that you need to have the images for the 360 Viewer already in equirectangular form available. In case you do not own a 360 camera you can easily find a ton of images online by searching for “360 equirectangular image” or similar.
Also I added a few sample images to this tutorial.
Lets go :
Our goal here is to create a basic html page which can display 360 degree images. So the first thing we have to create is the basic HTML document like so :
Including first the A-Frame library ( which includes threejs ) and in the second line I use a component to better navigate using the cursor. At this point we can go ahead and fill in the contents of the HTML body.
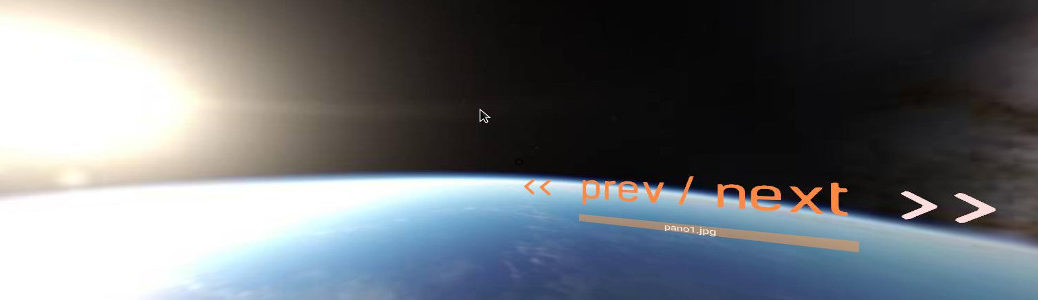
Working in 360 degree of freedom allows us to place elements inside the view and interact with them. I placed the controls to switch between images to the users right side so they don’t obstruct the main focal point in the 360 degree scene.
Below is the complete content and I will go through it line-by-line.
Line 1 : defines the scene. Everything happens within a scene. So think of it as the starting point for your adventure into VR. in order to use the mouse to select an object you have to specify the rayOrigin attribute here. Lines 2 – 14 : we define the assets ( images video, models, audio etc ) in these lines. The scene will not start before all assets are buffered in the browser. You can also dynamically load contents in which case you may not want to define them in the assets section. Line 15 : defines the sky-box, which is basically a sphere on which the equirectangular image is plastered. Lines 16 – 24 : Here we define the camera and the cursor. The drag-look-control enables the mouse to drag the frame which make navigation easier and more natural. I also added animations to the cursor to make things a bit ‘nicer’. Lines 25 – 32 : Here we create three strings which we display in 3D space. “<<", "prev / next", and ">>”. Again some animation when the prev or next events are triggered. Lines 33 – 35 : These two lines define an invisible box around the “<<", and ">>” text to allow us to select something with our mouse. YOu cannot directly point and select a text. Once selected, the events are then routed forward to the actual text elements to trigger the animation.
That was it, that was all we had to do to get the scene setup and ready. Except …
Finally some JavaScript
You can use the above and you can already immerse yourself in a 360 degree world, except you will not be able to switch between images as we have not yet implemented the JavaScript handler for the mouse action. So lets do that then …
  var gPanoStart = 1;
  var gPanoEnd   = 10;
  AFRAME.registerComponent('prev-click', {
    init: function () {
      this.el.addEventListener ( 'click', function (evt) {
        var txt = document.getElementById ( "prev-txt" );
        txt.click ( );
        var el = document.getElementById ( "pano" );
        if ( ! el.cnt || el.cnt <= gPanoStart )
          el.cnt = gPanoEnd+1;
        el.cnt--;
        var src, srcName = "pano"+el.cnt;
        src = document.getElementById ( srcName );

        var fileName = src.src.replace(/^.*[\\\/]/, '')
        el.setAttribute ( "src", "#"+srcName );
        txt = document.getElementById ( "file-name" );
        txt.setAttribute ( "text", "value", fileName );
      } );
      this.el.addEventListener ( 'mouseenter', function (evt) {
        var txt = document.getElementById ( "prev-txt" );
        txt.setAttribute ( "color", "#FFDDDD" );
      } );
      this.el.addEventListener ( 'mouseleave', function (evt) {
        var txt = document.getElementById ( "prev-txt" );
        txt.setAttribute ( "color", "#FF8844" );
      } );
    }
  } );
  AFRAME.registerComponent('next-click', {
    init: function () {
      this.el.addEventListener ( 'click', function (evt) {
        var txt = document.getElementById ( "next-txt" );
        txt.click ( );
        var el = document.getElementById ( "pano" );
        if ( ! el.cnt || el.cnt >= gPanoEnd )
          el.cnt = gPanoStart-1;
        el.cnt++;
        var src, srcName = "pano"+el.cnt;
        src = document.getElementById ( srcName );

        var fileName = src.src.replace(/^.*[\\\/]/, '')
        el.setAttribute ( "src", "#"+srcName );
        txt = document.getElementById ( "file-name" );
        txt.setAttribute ( "text", "value", fileName );
      } );
      this.el.addEventListener ( 'mouseenter', function (evt) {
        var txt = document.getElementById ( "next-txt" );
        txt.setAttribute ( "color", "#FFDDDD" );
      } );
      this.el.addEventListener ( 'mouseleave', function (evt) {
        var txt = document.getElementById ( "next-txt" );
        txt.setAttribute ( "color", "#FF8844" );
      } );
    }
  } );
Both of these functions are almost identical, the first handles the prev-action, the second handles the next-action. I could have optimized it to decrease the code footprint but this would make it harder to read it. So lets only look at the first function. Lines 1 – 2 : Here we define the global variables containig the starting and ending number of the images to load. Line 3 : registerComponent is A-Frames way to do stuff. prev-click is the invisible rectangle which we are using to capture the mouse ‘ray’ to cause a certain action like click, mouseenter, or mouseout. Line 4 : init. ‘nough said. just go with me here. Lines 6 – 7 : Here we get the dom element of the actual visible text element and trigger a click event. This in turn will trigger the animation which we have defined for this element. Line 9 : we retrieve the dom element of the sky-box. Lines 9 – 13 : Here we make sure the counter is in between Start and End, and we create the id of the source file as defined in the <a-assets> – tag. Line 15 : Here we get the ‘src’ attribute of the dom element and extract the actual file name to display. Line 16 : is what makes the image switch, where we set the src of the sky-box. Lines 17 – 18 : These two lines change the display of the filename inside the A-Frame. This way you know what you are looking at. Lines 20 – 27 : These two functions will simply change the text color of the prev and next text to imply a hot-spot to the user.
Aside from line 3 and 4 this should look all too familiar to anyone who tinkered in plain old javaScript ( and who has not done so ? ).
You can get this code, adjust the images, and use it to add a 360 degree image viewer into your own web page. You can also use what you have learned here today and add additional control elements like slideshow, auto-rotate, hot-spots etc to it.
360° image Viewer:
I also created a video to set this up which you can find here …
Please follow this link here … to play with the code.
The internet has evolved a lot since it’s inception with the initial intend to serve as a means to link hypertext documents together. The browser is now as capable as anything and when chrome WebGL support was introduced in 2011 we opened the portal to another dimension for the web.
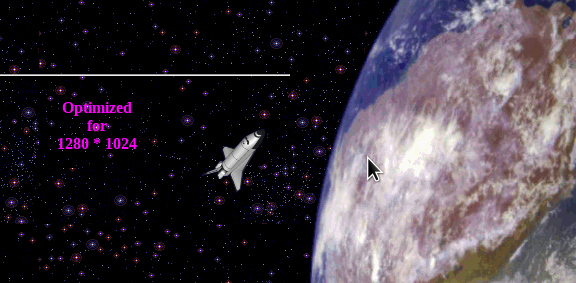
Microsoft introduced the concept of DHTML (Dynamic HTML) with the release of Internet Explorer 4 in 1997. This first step away from static contents allowed you to dynamically size and move things around, E.g. like the space-shuttle and the satellite on my first homepage. Example of DHTML
In 2008 the first working draft of HTML5 came out and with it the beginning of the end of Flash. Two new technologies in particular caused a lot of excitment in the web development community. SVG, and Canvas ( 2D-Context only ).
WebGL is rendered in hardware and is thus quite fast and capable. Aside from writing your own games you can also use it like any other graphic asset on your web page and E.g. use it as your dynamic, über-cool 3D background.
The only thing you will have to keep in mind is the performance of your visitors computers / mobile devices.
Three.JS, ShaderToy and WebGL
In this episode I am going to develop a 3D animated background in POJS ( Plain Old JavaScript ), as well as in QooxDoo. The goal is to use one of the demos from ShaderToy, convert it to Three.JS and utilize it inside a canvas – tag with a 3D-Context.
Well if the last sentence was too much for you, don’t worry I will go through all details of this in the next few paragraphs.
But first lets have a look at the individual tools and technologies.
WebGL
As previously stated WebGL became part of the browser in 2011. In order to create a simple scene you have to write a bunch of JavaScript code
Three.js was first released by Ricardo Cabello ( Aka MrDOOB ) to GitHub in April 2010.
It is released under the MIT license and became the de-facto standard for web based 3D programming in no time.
The reason is that three.js adds an abstraction layer on top of WebGL which allows you to program it more as you would expect it to be.
Below is a Three.JS powered “Hello World” example.
<!doctype html>
<html>
<head>
        <title>Three.JS Hello World</title>
</head>
<body style="margin: 0; overflow: hidden; background-color: #000;" >
        <div id="webgl"></div>
        <script src="three.min.js"></script>
<script>

        var webglEl = document.getElementById('webgl');
        var width   = window.innerWidth;
        var height  = window.innerHeight;

        // Earth params
        var radius   = 0.5;
        var segments = 32;
        var rotation = 6;

        var scene = new THREE.Scene();
        var camera = new THREE.PerspectiveCamera(45, width / height, 0.01, 1000);
        camera.position.z = 1.5;
        var renderer = new THREE.WebGLRenderer();
        renderer.setSize(width, height);
        scene.add(new THREE.AmbientLight(0x333333));
        var light = new THREE.DirectionalLight(0xffffff, 1);
        light.position.set(5,3,5);
        scene.add(light);

        var sphere = createSphere(radius, segments);
        sphere.rotation.y = rotation;
        scene.add(sphere)

        var clouds = createClouds(radius, segments);
        clouds.rotation.y = rotation;
        scene.add(clouds)

        var stars = createStars(90, 64);
        scene.add(stars);
        webglEl.appendChild(renderer.domElement);
        render();

        function render() {
                sphere.rotation.y += 0.0005;
                clouds.rotation.y += 0.0005;
                requestAnimationFrame(render);
                renderer.render(scene, camera);
        }

        function createSphere(radius, segments) {
                return new THREE.Mesh(
                        new THREE.SphereGeometry(radius, segments, segments),
                        new THREE.MeshPhongMaterial({
                                map:         THREE.ImageUtils.loadTexture('images/2_no_clouds_4k.jpg'),
                                bumpMap:     THREE.ImageUtils.loadTexture('images/elev_bump_4k.jpg'),
                                bumpScale:   0.005,
                                specularMap: THREE.ImageUtils.loadTexture('images/water_4k.png'),
                                specular:    new THREE.Color('grey')
                        })
                );
        }

        function createClouds(radius, segments) {
                return new THREE.Mesh(
                        new THREE.SphereGeometry(radius + 0.003, segments, segments),
                        new THREE.MeshPhongMaterial({
                                map:         THREE.ImageUtils.loadTexture('images/fair_clouds_4k.png'),
                                transparent: true
                        })
                );
        }

        function createStars(radius, segments) {
                return new THREE.Mesh(
                        new THREE.SphereGeometry(radius, segments, segments),
                        new THREE.MeshBasicMaterial({
                                map:  THREE.ImageUtils.loadTexture('images/galaxy_starfield.png'),
                                side: THREE.BackSide
                        })
                );
        }

</script>
</body>
</html>
Render Output :
As you can see, using Three.JS we can achieve much more with about the same number of lines. That is not to say that it is not possible to create amazing things in WebGL in just under 100 lines of code, however the best would be if you combine both approaches.
Please feel free to visit the main web page for Three.js and spend some time browsing the available samples. I am certain that you will discover some joy and wonders on this web page. In case you don’t know where to start. This is a perfect place to spend about 19 minutes of your existence, to remember the fallen.
Now let’s look at another favorite of mine. This time it is a web page to show off …
ShaderToy wonderland
If you visit the Shadertoy.com – web page, you will find a thousands of cool demos, including some small games, all written utilizing the graphics card hardware accelerate shader pipelines.
What I wanted to achieve in this episode of teaching JavaScript was to add this toy by Frankenburgh as a background to AstraNOS. Some minor adjustments, like no sound and no story telling ( yes if you watch the original long enough you will get the story ), just an ever spinning Galaxy …
ShaderToy and Three.JS combination
In order to marry those two we have to know the data required for ShaderToy to work and create the appropriate interface for them in the shader such that Three.JS can take on the rendering. See, Shadertoy creates all its magic on a 2D plane and displays the ‘texture’ then accordingly in the 3D context. Three.JS is all 3D through and through …
The following sample glues them into one big happy unity and dynamically loads the ( almost never changing ) vertex.shader, and then the fragment.shader code.
<!DOCTYPE html>
<html lang="en">
<head>
        <title>Galaxy</title>
</head>
<body style="background-color: #000000; margin: 0px; overflow: hidden; ">
        <div id="container"></div>
        <script src="three.min.js"></script>

<script>
function fetchFile ( path, callback, ctx )  {
    var httpRequest = new XMLHttpRequest();
    httpRequest.onreadystatechange = function() {
        if (httpRequest.readyState === 4) {
            if (httpRequest.status === 200) {
                if (callback) callback( httpRequest.responseText );
            }
        }
    };
    httpRequest.open('GET', path);
    httpRequest.send();
}

document.loadData = function ( files, clb, ctx, pre )  {
  var rsp  = [];
  var load = function ( list )  {
    if ( list.length === 0 ) {
      if ( clb )
        clb.call ( ctx, rsp );
      return;
    }
    var res = list.shift ( );
    var uri = pre ? pre : ""; uri += res;
    fetchFile ( uri, function ( data )  {
      rsp.push ( data );
      load ( list );
    }, this );
  };
  load ( files );
};

var container;
var camera, scene, renderer;
var uniforms;
var startTime;
var clock;

function init ( vert, frag )  {
  container = document.getElementById( 'container' );
  clock  = new THREE.Clock  ( );
  camera = new THREE.Camera ( );
  scene  = new THREE.Scene  ( );
  camera.position.z = 1;

  var geometry = new THREE.PlaneGeometry( 3, 3 );
  uniforms = {
    iGlobalTime: { type: "f", value: 1.0 },
    iResolution: { type: "v2", value: new THREE.Vector2() }
  };

  var fs = boilerPlate ( 1 ) + frag + boilerPlate ( 2 );
  var material = new THREE.ShaderMaterial( {
    uniforms: uniforms,
    vertexShader:   vert,
    fragmentShader: fs
  } );

  var mesh = new THREE.Mesh( geometry, material );
  scene.add( mesh );

  renderer = new THREE.WebGLRenderer();
  container.appendChild( renderer.domElement );

  onWindowResize();

  window.addEventListener( 'resize', onWindowResize, false );
}

function onWindowResize( event ) {
  uniforms.iResolution.value.x = window.innerWidth;
  uniforms.iResolution.value.y = window.innerHeight;
  renderer.setSize( window.innerWidth, window.innerHeight );
}

function animate ( )  {
  requestAnimationFrame ( animate );
  render ( );
}

function render() {
  uniforms.iGlobalTime.value += clock.getDelta ( );
  renderer.render ( scene, camera );
}

document.loadData ( [ "vertex.shader", "fragment.shader" ], function ( data )  {
  this.init ( data[0], data[1] );
  animate ( );
}, window, "/data/webgl/" );

   function boilerPlate ( part )  {
      var ret = "";
      if ( part === 1 )  {
        ret  = "//#extension GL_OES_standard_derivatives : enable\n";
        ret += "//#extension GL_EXT_shader_texture_lod : enable\n";
        ret += "#ifdef GL_ES\n";
        ret += "precision highp float;\n";
        ret += "#endif\n";
        ret += "uniform vec2      iResolution;\n";
        ret += "uniform float     iGlobalTime;\n";
        ret += "uniform float     iChannelTime[4];\n";
        ret += "uniform vec4      iMouse;\n";
        ret += "uniform vec4      iDate;\n";
        ret += "uniform float     iSampleRate;\n";
        ret += "uniform vec3      iChannelResolution[4];\n";
        ret += "uniform int       iFrame;\n";
        ret += "uniform float     iTimeDelta;\n";
        ret += "uniform float     iFrameRate;\n";
        ret += "struct Channel\n";
        ret += "{\n";
        ret += "    vec3  resolution;\n";
        ret += "    float time;\n";
        ret += "};\n";
        ret += "uniform Channel iChannel[4];\n";
        ret += "uniform sampler2D iChannel0;\n";
        ret += "uniform sampler2D iChannel1;\n";
        ret += "uniform sampler2D iChannel2;\n";
        ret += "uniform sampler2D iChannel3;\n";
        ret += "void mainImage( out vec4 c,  in vec2 f );\n";
      }
      else {
        ret  = "void main( void ){\n";
        ret += "  vec4 color = vec4(0.0,0.0,0.0,1.0);\n";
        ret += "  mainImage( color, gl_FragCoord.xy );\n";
        ret += "  color.w = 1.0;\n";
        ret += "  gl_FragColor = color;\n";
        ret += "}\n";
      }
      return ret;
    }

</script>

        </body>
</html>
// Galaxy shader
//
// Created by Frank Hugenroth  /frankenburgh/   07/2015
// Released at nordlicht/bremen 2015

// random/hash function
float hash( float n )
{
  return fract(cos(n)*41415.92653);
}

// 2d noise function
float noise( in vec2 x )
{
  vec2 p  = floor(x);
  vec2 f  = smoothstep(0.0, 1.0, fract(x));
  float n = p.x + p.y*57.0;

  return mix(mix( hash(n+  0.0), hash(n+  1.0),f.x),
    mix( hash(n+ 57.0), hash(n+ 58.0),f.x),f.y);
}

float noise( in vec3 x )
{
  vec3 p  = floor(x);
  vec3 f  = smoothstep(0.0, 1.0, fract(x));
  float n = p.x + p.y*57.0 + 113.0*p.z;

  return mix(mix(mix( hash(n+  0.0), hash(n+  1.0),f.x),
    mix( hash(n+ 57.0), hash(n+ 58.0),f.x),f.y),
    mix(mix( hash(n+113.0), hash(n+114.0),f.x),
    mix( hash(n+170.0), hash(n+171.0),f.x),f.y),f.z);
}

mat3 m = mat3( 0.00,  1.60,  1.20, -1.60,  0.72, -0.96, -1.20, -0.96,  1.28 );

// Fractional Brownian motion
float fbmslow( vec3 p )
{
  float f = 0.5000*noise( p ); p = m*p*1.2;
  f += 0.2500*noise( p ); p = m*p*1.3;
  f += 0.1666*noise( p ); p = m*p*1.4;
  f += 0.0834*noise( p ); p = m*p*1.84;
  return f;
}

float fbm( vec3 p )
{
  float f = 0., a = 1., s=0.;
  f += a*noise( p ); p = m*p*1.149; s += a; a *= .75;
  f += a*noise( p ); p = m*p*1.41; s += a; a *= .75;
  f += a*noise( p ); p = m*p*1.51; s += a; a *= .65;
  f += a*noise( p ); p = m*p*1.21; s += a; a *= .35;
  f += a*noise( p ); p = m*p*1.41; s += a; a *= .75;
  f += a*noise( p );
  return f/s;
}

void mainImage( out vec4 fragColor, in vec2 fragCoord )
{
        float time = iGlobalTime * 0.1;

        vec2 xy = -1.0 + 2.0*fragCoord.xy / iResolution.xy;

        // fade in (1=10sec), out after 8=80sec;
        float fade = 1.0; //min(1., time*1.)*min(1.,max(0., 15.-time));
        // start glow after 5=50sec
        float fade2= 0.37; //max(0., time-10.)*0.37;
        float glow = max(-.25,1.+pow(fade2, 10.) - 0.001*pow(fade2, 25.));


        // get camera position and view direction
        vec3 campos = vec3(500.0, 850., 1800.0 ); //-.0-cos((time-1.4)/2.)*2000.); // moving
        vec3 camtar = vec3(0., 0., 0.);

        float roll = 0.34;
        vec3 cw = normalize(camtar-campos);
        vec3 cp = vec3(sin(roll), cos(roll),0.0);
        vec3 cu = normalize(cross(cw,cp));
        vec3 cv = normalize(cross(cu,cw));
        vec3 rd = normalize( xy.x*cu + xy.y*cv + 1.6*cw );

        vec3 light   = normalize( vec3(  0., 0.,  0. )-campos );
        float sundot = clamp(dot(light,rd),0.0,1.0);

        // render sky

    // galaxy center glow
    vec3 col = glow*1.2*min(vec3(1.0, 1.0, 1.0), vec3(2.0,1.0,0.5)*pow( sundot, 100.0 ));
    // moon haze
    col += 0.3*vec3(0.8,0.9,1.2)*pow( sundot, 8.0 );

        // stars
        vec3 stars = 85.5*vec3(pow(fbmslow(rd.xyz*312.0), 7.0))*vec3(pow(fbmslow(rd.zxy*440.3), 8.0));

        // moving background fog
    vec3 cpos = 1500.*rd + vec3(831.0-time*30., 321.0, 1000.0);
    col += vec3(0.4, 0.5, 1.0) * ((fbmslow( cpos*0.0035 ) - .5));

        cpos += vec3(831.0-time*33., 321.0, 999.);
    col += vec3(0.6, 0.3, 0.6) * 10.0*pow((fbmslow( cpos*0.0045 )), 10.0);

        cpos += vec3(3831.0-time*39., 221.0, 999.0);
    col += 0.03*vec3(0.6, 0.0, 0.0) * 10.0*pow((fbmslow( cpos*0.0145 )), 2.0);

        // stars
        cpos = 1500.*rd + vec3(831.0, 321.0, 999.);
        col += stars*fbm(cpos*0.0021);


        // Clouds
    vec2 shift = vec2( time*100.0, time*180.0 );
    vec4 sum = vec4(0,0,0,0);
    float c = campos.y / rd.y; // cloud height
    vec3 cpos2 = campos - c*rd;
    float radius = length(cpos2.xz)/1000.0;

    if (radius<1.8)
    {
          for (int q=10; q>-10; q--) // layers
      {
                if (sum.w>0.999) continue;
        float c = (float(q)*8.-campos.y) / rd.y; // cloud height
        vec3 cpos = campos + c*rd;

                float see = dot(normalize(cpos), normalize(campos));
                vec3 lightUnvis = vec3(.0,.0,.0 );
                vec3 lightVis   = vec3(1.3,1.2,1.2 );
                vec3 shine = mix(lightVis, lightUnvis, smoothstep(0.0, 1.0, see));

                // border
            float radius = length(cpos.xz)/999.;
            if (radius>1.0)
              continue;

                float rot = 3.00*(radius)-time;
        cpos.xz = cpos.xz*mat2(cos(rot), -sin(rot), sin(rot), cos(rot));

                cpos += vec3(831.0+shift.x, 321.0+float(q)*mix(250.0, 50.0, radius)-shift.x*0.2, 1330.0+shift.y); // cloud position
                cpos *= mix(0.0025, 0.0028, radius); // zoom
        float alpha = smoothstep(0.50, 1.0, fbm( cpos )); // fractal cloud density
                alpha *= 1.3*pow(smoothstep(1.0, 0.0, radius), 0.3); // fade out disc at edges
                vec3 dustcolor = mix(vec3( 2.0, 1.3, 1.0 ), vec3( 0.1,0.2,0.3 ), pow(radius, .5));
        vec3 localcolor = mix(dustcolor, shine, alpha); // density color white->gray

                float gstar = 2.*pow(noise( cpos*21.40 ), 22.0);
                float gstar2= 3.*pow(noise( cpos*26.55 ), 34.0);
                float gholes= 1.*pow(noise( cpos*11.55 ), 14.0);
                localcolor += vec3(1.0, 0.6, 0.3)*gstar;
                localcolor += vec3(1.0, 1.0, 0.7)*gstar2;
                localcolor -= gholes;

        alpha = (1.0-sum.w)*alpha; // alpha/density saturation (the more a cloud layer\\\'s density, the more the higher layers will be hidden)
        sum += vec4(localcolor*alpha, alpha); // sum up weightened color
          }

          for (int q=0; q<20; q++) // 120 layers
      {
                if (sum.w>0.999) continue;
        float c = (float(q)*4.-campos.y) / rd.y; // cloud height
        vec3 cpos = campos + c*rd;

                float see = dot(normalize(cpos), normalize(campos));
                vec3 lightUnvis = vec3(.0,.0,.0 );
                vec3 lightVis   = vec3(1.3,1.2,1.2 );
                vec3 shine = mix(lightVis, lightUnvis, smoothstep(0.0, 1.0, see));

                // border
            float radius = length(cpos.xz)/200.0;
            if (radius>1.0)
              continue;

                float rot = 3.2*(radius)-time*1.1;
        cpos.xz = cpos.xz*mat2(cos(rot), -sin(rot), sin(rot), cos(rot));

                cpos += vec3(831.0+shift.x, 321.0+float(q)*mix(250.0, 50.0, radius)-shift.x*0.2, 1330.0+shift.y); // cloud position
        float alpha = 0.1+smoothstep(0.6, 1.0, fbm( cpos )); // fractal cloud density
                alpha *= 1.2*(pow(smoothstep(1.0, 0.0, radius), 0.72) - pow(smoothstep(1.0, 0.0, radius*1.875), 0.2)); // fade out disc at edges
        vec3 localcolor = vec3(0.0, 0.0, 0.0); // density color white->gray

        alpha = (1.0-sum.w)*alpha; // alpha/density saturation (the more a cloud layer\\\'s density, the more the higher layers will be hidden)
        sum += vec4(localcolor*alpha, alpha); // sum up weightened color
          }
    }
        float alpha = smoothstep(1.-radius*.5, 1.0, sum.w);
    sum.rgb /= sum.w+0.0001;
    sum.rgb -= 0.2*vec3(0.8, 0.75, 0.7) * pow(sundot,10.0)*alpha;
    sum.rgb += min(glow, 10.0)*0.2*vec3(1.2, 1.2, 1.2) * pow(sundot,5.0)*(1.0-alpha);

        col = mix( col, sum.rgb , sum.w);//*pow(sundot,10.0) );

    // haze
        col = fade*mix(col, vec3(0.3,0.5,.9), 29.0*(pow( sundot, 50.0 )-pow( sundot, 60.0 ))/(2.+9.*abs(rd.y)));

    // Vignetting
        vec2 xy2 = gl_FragCoord.xy / iResolution.xy;
        col *= vec3(.5, .5, .5) + 0.25*pow(100.0*xy2.x*xy2.y*(1.0-xy2.x)*(1.0-xy2.y), .5 );

        fragColor = vec4(col,1.0);
}
Render Output :
And now to AstraNOS
At this point we are almost at the point of adding it as a background to AstraNOS. I have to plugin the code into a QooxDoo base class called qx.core.Object and we are good to go.
Galaxy Background in AstraNOS
You can watch my video Here
And as usual you can go and play with the actual code Here …
I have just released the third video in the JavaScript Bushido series. This video will go into what is REST and how to leverage this interface in a Qooxdoo web application.
RESTful API Logo
The normal HTTP based request / response paradigm shifted in 2005, when Ajax ( also known as XMLHttpRequest ) became popular through the utilization in google maps.
Before Ajax every call to the back-end server would usually refresh the whole web page unless you would do some iframe based trickery.
Additionally in 2011 both WebSockets, and WebRTC have been added to most browsers which allow an efficient way to communicate between server and browser, as well as browser to browser.
Using either method, it is possible to load data or code dynamically into the web page.
A RESTFula API usually provides a means to do CRUD operations on an object.
What is CRUD:
CRUD is an acronym and stands for Create, Read, Update, and Delete. It is a way to say
“I want to be able to create, read, update, or delete something somewhere” compressed into a single word.
Before there was REST there was JSON-RPC:
REST has become a de-facto standard in modern web based applications. It has replaced the XML based SOAP/WSDL
as well as JSON-RPC.
How does a REST interface look like ?
A typical RESTful API is accessed through a well defined endpoint on a web server.
For example if you go https://jsonplaceholder.typicode.com/photos/ you will receive a JSON response which is an array of 5000 objects.
[
  {
    "albumId": 1,
    "id": 1,
    "title": "accusamus beatae ad facilis cum similique qui sunt",
    "url": "http://placehold.it/600/92c952",
    "thumbnailUrl": "http://placehold.it/150/92c952"
  },
  {
    "albumId": 1,
    "id": 2,
    "title": "reprehenderit est deserunt velit ipsam",
    ...
If you are interested in more detail about one of the returned items you would additionally provide the id https://jsonplaceholder.typicode.com/photos/7 behind the RESTful endpoint.
{
  "albumId": 1,
  "id": 7,
  "title": "officia delectus consequatur vero aut veniam explicabo molestias",
  "url": "http://placehold.it/600/b0f7cc",
  "thumbnailUrl": "http://placehold.it/150/b0f7cc"
}
But how do I create things
The sample above only showed the retrieval of datafrom a web server. But as I said before REST lets you also execute create, update, and delete operations on the backend.
This is achieved by using different HTTP VERBS
POST: will create an object
PUT: will modify / update an object
GET: will retrieve an object ( mostly in JSON format )
DELETE: will delete an object
OPTIONS: will provide information about the API call ( not very often used )
The best way to experiment with REST is to install POSTMAN as a plugin for chrome.
You can watch my video Here
And as usual you can go and play with the actual code Here …
This will take some time to complete the download because a git repository contains the complete history. Once the download completes you can create a new project through
  bash> mkdir workspace && cd workspace && ../qooxdoo/create-application.py --name=DemoApp
  bash> cd DemoApp && ./generate.py build
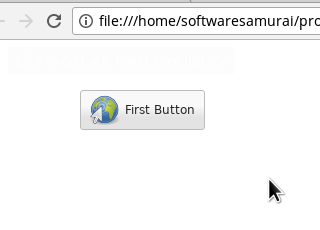
The final result:
This will generate a simple push button on a web page.
First Qooxdoo Application
Now granted that this is not the coolest web page out there but you have only spent about 5 minutes to create it. Now if you spend some more time on it you can eventually create more complex applications, like a Random Password Generator ( approx 100 lines of code ) or a simple calculator ( approx 200 lines of code ).
As a matter of fact you can create quite complex applications which natively support multiple languages, multiple Themes, multiple icon sets etc … . I believe if you have an idea of a complex web based application you will find a solution with Qooxdoo.
As with the first episode, you can checkout the code online Here …
Questions or suggestions ?
Please don’t hesitate to leave a comment below if you have questions or suggestions. I had fun creating this short tutorial and I hope it is useful to you.
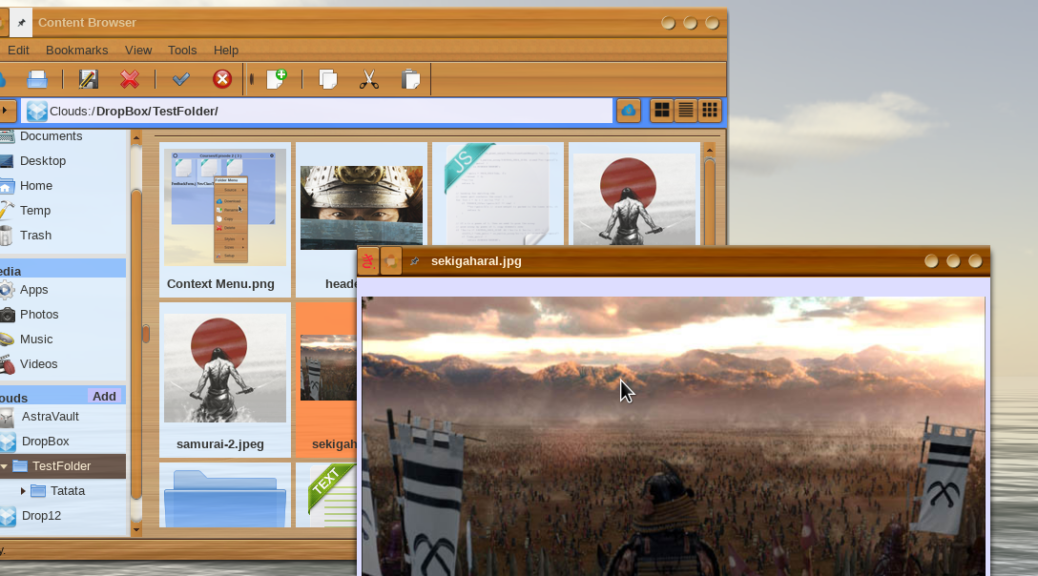
Imagine that you have written a really good web app, and you have distributed it to many customers these customers in turn acquired a lot of customers.
Now fast forward a few months and all of a sudden you are getting calls to help fix issues with your platform. For some unforsaken reason your cloud storage integration stopped working.
Because you have moved on to the next thing you have only limited time to spend on fixing the issue. What you eventually discover is that a service provide decided to change the API from version X to version Y.
Now you have to sit down and spend a couple of days fixing what is been broken.
Sleep Mode Zero
That is something you have to deal with all the time in an actively changing web environment.
APIs change and certain providers may stop offering services or worse go out of business.
How to avoid the pain
Most web based APIs use a RESTFul interface to their services. As such the steps involved in utilizing a online service is usually accomplished through OAuth2 authorization to gain secure access to users data, followed by the utilization of the actual API.
As a developer you are free to develop to a specific API or to abstract the API in a way where you can easily replace one service/API with another.
However every single line of code you write you will have to maintain yourself and make sure that changes over time will not break functionality.
Cloud abstraction layer, the better way
Every now and then you can do one better though. Take for example web storage. There are many providers of web storage, such as box, Dropbox, S3, Google storage etc. If you want to offer a wide selection of possible back-end storage platforms you would be well advised to look into a framework such as Flysystem for PHP.
The PHP League Logo
Flysystem abstracts it the different back-end APIs and provided a unified interface. You can find a multitude of third party connectors, such as Azure, S3, Dropbox, box etc. You can also find some strange adaptations such as GitHub or flicker for it in case you have use for it.
The most important thing to remember though is that if one of the available back-end APIs changes you will be able to replace it with almost no additional work required on your side.
Also if a provider goes out of business, you can quickly switch to another provider. And finally, if a service provider changes the API version and ignores backwards compatibility you can simply replace the old library with a new library with the same API calls.
There are however some shortcomings to adding an cloud abstraction layer
It is usually not as comprehensive in its feature set
The additional code will slow down the requests a few milliseconds
It will increase the projects complexity
Not every supported back-end-API may provide the required data. E.g. certain storage back-ends don’t support a file system natively
AstraNOS integration
Since I had to move from Dropbox v1 to Dropbox v2, I switched over to utilize the cloud abstraction layer provided by Flysystem for AstraNOS. Integrating the OAuth2 client from the PHP League us also unifying the signups mechanism for cloud storage back-end ( and more if I ever need to ).
Working Dropbox integration
With this addition I will now be able to increase the available back-end services with little additional work, though I would guess that it still requires a good day per back-end.
However this is a price worth paying if we can leverage multiple cloud based back-ends at the same time and in the same environment. Working seamlessly between them as it has been intended.