Adding a push-button and connecting it up the a GPIO port is as simple as writing a tiny pyhon script to initialize the IO port for input and utilizing a built-in pull-Up button. The Raspberry PI button is then capable to act as a Doorbell button.
After I connected the loudspeaker to the USB soundcard and soldered the USB connection from the Raspberry PI to the sound card I was then able to use alsaconfig to select it and then use:
speaker-test -c2 -twav
to actually hear some audio through the soundcard.

Now the next step was to connect GPIO port 17 to GND and use the built in bull-down-resistors to detect a button-press event.
Here is the push_button.py – python script which I use.
#!/usr/bin/python2.7

import time
import RPi.GPIO as GPIO
import subprocess

GPIO.setmode(GPIO.BCM)
GPIO.setup(17, GPIO.IN, pull_up_down=GPIO.PUD_UP)

def my_callback(channel):
    subprocess.call ( "/root/bin/ding_dong.sh" )

# add falling edge detection on a channel, ignoring further edges for 400ms for switch bounce handling
GPIO.add_event_detect(17, GPIO.FALLING, callback=my_callback, bouncetime=400)

while True:
    # Loop once a day
    time.sleep(24*60*60)

GPIO.cleanup()
This script is straightforward and is simply waiting for a button press on GPIO pin 17 ( to GND ). The final loop is a forever loop with a one-day delay which will help keep the responsiveness of the Raspberry PI button at a good level. If during this time a button press was detected, then the ding_don.sh – script, which in turn plays a sound on the speaker.
I plugged it into /root/bin/push_button.py and made sure it is executable
sudo mkdir /root/bin
sudo vi /root/bin/push_button.py
sudo chmod +x /root/bin/push_button.py
Below is the pin-out of the Raspberry PI Zero W.
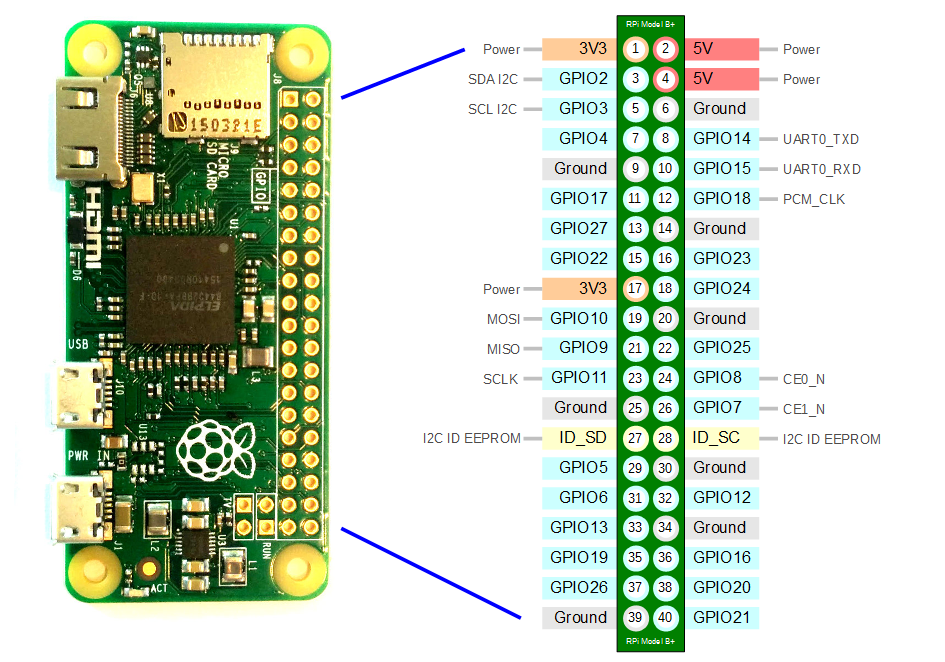
GPIO ports
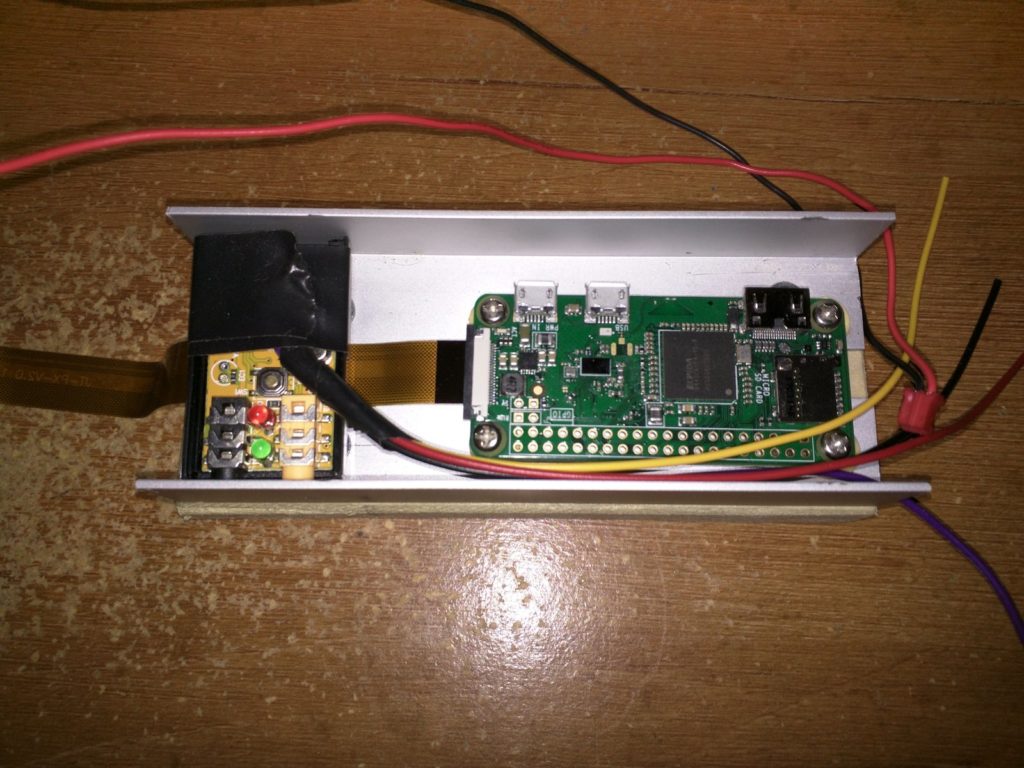
In this case I connected GPIO17 ( orange wire ) and GND ( blue wire ) ( PIN 11, and PIN 14 ) to the doorbell button.

Instead of packing all the functionality into one python script I decided to have python call a simple bash – script to do the actual work. Here is the ding_dong.sh script, which is called by the python script and also resides in /root/bin/
#!/bin/bash

mpg=`pidof mpg123`
if [ "x${mpg}" == "x" ];
then
  mpg123 /root/SoundHelix-Song-14.mp3 &
else
  killall -9 mpg123
fi
echo "Ding Dong"
sudo vi /root/bin/ding_dong.sh
sudo chmod +x /root/bin/ding_dong.sh
As the last step I wanted to have this script run all the time and to make sure it is started at startup of the PI :
[Unit]
Description=Push Button Service

[Service]
ExecStart=/root/bin/push_button.py
StandardOutput=null

[Install]
WantedBy=multi-user.target
Alias=ipush_button.service
sudo vi /lib/systemd/system/push_button.service
sudo systemctl enable push_button
The Raspberry PI button is now all set to act as the Doorbell button for my Video-Doorbell project.