
Sooner or later all web developer will have to create a Login form for one of their projects. You can find a lot of sample code and frameworks out there. In fact this is one of those times where you end up in information overload. There are millions of options but which one to pick ?
QooxDoo is a great framework to write complex web applications which acts and feels like a standard windows client. These so called SPAs ( Single Page Applications ) are a great way to create a valuable presence online and to offer your customers a very special treat.
But is QooxDoo flexible enough to build a stunning login form with it ?
I found that QooxDoo and php go together like peanut butter and jelly. And yes you can also use a RESTFul API to achieve the same however using PHP will offer you one advantage over E.g. a NodeJS based back-end. With most shared hosting services you will not be able to use NodeJS.
Form and Function:
So what are we looking for in a login form ? We want a nice and clean looking interface and we want to have the ability to
- Login
- Sign Up
- Recover password
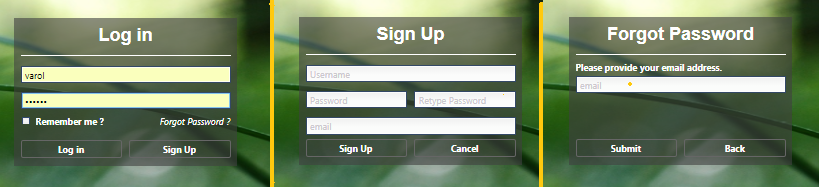
So we are actually looking at three different forms and not just a single one.
That serves me well
For the PHP back-end I chose a single user class which I found on Github because it keeps things simple enough while at the same time offering some basic type of security. There are plenty of other options for the back-end available and you can shoe-horn any back-end into this solution really.
The PHP code was adjusted a bit and I added the code in here for your convenience. You can also download the PHP code from the following link Secure-User-Login-And-Authentication-Class
Here is the code which I added. Obviously in a real environment you want to separate this code out into its own file ( or files ).
// Simple input handling.
// Please note that no user input validation is done
$auth = new userAuth;
$type = $_GET['type'];
$name = $_GET['username'];
$pass = $_GET['password'];
$email= $_GET['email'];
$remember = $GET['remember'];
switch ( $type )  {
  case "login":  echo $auth->user_login  ( $name, $pass, $remember ) ? "true" : "false"; break;
  case "logout": echo $auth->user_logout ( ) ? "true" : "false"; break;
  case "forgot": echo $auth->forgot_password ( $email ) ? "true" : "false"; break;
  case "signup": echo $auth->create_user ( $name, $pass, $email, $remember ) ? "true" : "false"; break;
  case "check":  echo $auth->is_logged_in ( ) ? "true" : "false"; break;
  case "newDB":  echo $auth->create_user_table ( ) ? "true" : "false"; break;
  default: echo "Bad type"; break;
}
Now since we are going to use Ajax calls to the backend please keep in mind that any additional request to the backend ( E.g. like to display user data ) must be secured on the server side. You cannot rely on any security checks on the client side.
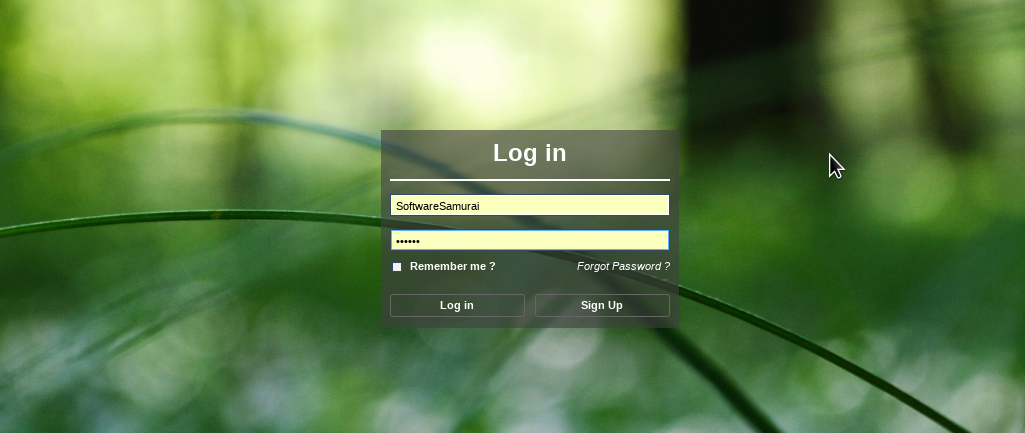
Login Form
In this post I want to mostly focus on the front-end part of the Login Form. Using QooxDoo to build the UI will require a few tweaks to the look and feel of the widgets in here.
I could have gone and created new styles following the qooxdoo way and I could have also created the LoginForm using the standard generate.py server side script. However I chose to use a functional complete, minified, qooxdoo library instead to bootstrap this application.
<!DOCTYPE html>
<html>
<head>
    <title>login</title>
    <meta charset="utf-8">
    <meta name="Author" CONTENT="SoftwareSamurai">
    <meta name="Description" CONTENT="login" />
    <meta name="Keywords" CONTENT="some keywords" />
    <meta name="Classification" CONTENT="Klassifizierung">
    <script type="text/javascript" src="script/qx-6.0.0a.min.js"></script>
    <script type="text/javascript" src="LoginWindow.js"></script>
    <script type="text/javascript" src="SignupWindow.js"></script>
    <script type="text/javascript" src="ForgotWindow.js"></script>
    <script type="text/javascript" src="ApplicationWindow.js"></script>
</head>
<body>
  <script type="text/javascript">
    qx.Class.define ( "LoginWindow.Application", {
      extend : qx.application.Standalone,
      members: {
        main : function ( )  {
          this.base ( arguments );
          if ( qx.core.Environment.get ( "qx.debug" ) )  {
            qx.log.appender.Native;
            qx.log.appender.Console;
          }
          var root = this.getRoot ( );
          var decorator = new qx.ui.decoration.Decorator ( );
          decorator.setBackgroundImage ( "background.jpg" );
          decorator.setBackgroundRepeat( "scale" );
          this.getRoot ( ).setDecorator( decorator );
          this.rpc ( "type=check", function ( success )  {
            var win = null;
            if ( success )
              win = new ao.apps.users.SoftwareSamurai.ApplicationWindow ( );
            else
              win = new ao.apps.users.SoftwareSamurai.LoginWindow ( );
            win.show ( );
          },this );
        },
        rpc : function ( str, cb, ctx )  {
          var rpc = new qx.io.request.Xhr ( "user.class.php?"+str );
          rpc.addListener ( "success", function ( e, x, y ) {
             var req = e.getTarget ( );
             var rsp = req.getResponse ( );
             cb.call ( ctx, ( rsp === "true" ) );
          }, this );
          rpc.send ( );
        }
      }
    } );
    qx.core.Environment.add ( "qx.application", "LoginWindow.Application" );
  </script>
</body>
</html>
Using this approach has the advantage of being able to rapidly develop your application and then use the standard QooxDoo tools to compile and minify once you are sure you have all you want.
For a standard QooxDoo application you have the Application.js file, which I have folded into this html file.
So lets go though this code above:
Line 10 : Here we load the complete qooxdoo library in a minified version.
Linew 11 – 14 : These are the classes we are going to create today.
Line 18 : Every QooxDoo application has to be derived off of qx.application.Standalone.
Line 21 : This is the main entry function which is called once the application is completely loadedinto the browser and the widgets are initialized.
Line 28 – 31 : In order to set the background image for the complete window we have to set the applications decorator.
Line 32 – 39: These lines of code do call the backend and if the user is already logged in, then we display the main application window, otherwise we display the login form.
Line 41 – 49 : This function will call the backend form ( “user.class.php ), and call the supplied callback function back in the supplied context ( object ).
Line 52 : In order to create a qooxdoo application you have to set this variable to allow the framework to instantiate the appropriate class as the main application.
Log me in Scotty
If you are not currently already logged in you will create a new instance of LoginWindow. So lets take a look at this class.
One word upfront though first. All three classes are very similar in structure, so I will only talk about the LoginWindow here. You can find the code of the other classes following the link below this blog.
The first thing we have to take care of is to create the actual widgets.
qx.Class.define ( "ao.apps.users.SoftwareSamurai.LoginWindow",
{
  extend : qx.ui.container.Composite,
  construct : function ( ) {
    this.base ( arguments );
    this.setLayout ( new qx.ui.layout.Canvas ( ) );
    this.set ( { width: 300, height: 200 } );
    this._buildLogin ( );
    var top  = parseInt ( ( qx.bom.Document.getHeight ( ) - 200 ) / 2, 10 );
    var left = parseInt ( ( qx.bom.Document.getWidth  ( ) - 300 ) / 2, 10 );
    var app  = qx.core.Init.getApplication ( );
    var root = app.getRoot( );
    root.add ( this, { top: top, left: left } );
  },
  destruct : function ( )  {
  },
  members  :  {
    _buildLogin : function ( )  {
      var semi = new qx.ui.core.Widget ( );
      semi.set ( { opacity: 0.6, backgroundColor: "#404040" } );
      this.add ( semi, { top: 1, left: 1, right: 1, bottom: 1 } );

      var font = new qx.bom.Font ( 24, [ "Arial" ] );
      font.setBold ( true );
      //font.setColor ( "#FFFFFF" );
      var lbl = new qx.ui.basic.Label ( "<center><b style='color: #FFFFFF'>" + this.tr ( "Log in" ) + "</b></center>" );
      lbl.setFont ( font );
      lbl.setRich ( true );
      lbl.setWidth( this.getWidth ( ) - 20  );
      this.add ( lbl, { top: 10, left: 10 } );

      var line = new qx.ui.core.Widget ( );
      line.set ( { height: 2, backgroundColor: '#FFFFFF' } );
      this.add ( line, { top: 50, left: 10, right: 10 } );

      var name = new qx.ui.form.TextField ( );
      name.setPlaceholder ( this.tr ( "Username" ) );
      this.add ( name, { top: 65, left: 10, right: 10 } );
      this._name = name;

      var pass = new qx.ui.form.PasswordField ( );
      pass.setPlaceholder ( this.tr ( "Password" ) );
      this.add ( pass, { top: 100, left: 10, right: 10 } );
      this._pass = pass;

      var chk = new qx.ui.form.CheckBox ( "<b style='color: #FFFFFF'>" + this.tr ( "Remember me ?" ) + "</b>" );
      lbl = chk.getChildControl ( "label" );
      lbl.setRich ( true );
      this.add ( chk, { top: 130, left: 10 } );
      this._remember = chk;

      var strForgot = "<center><i style='color: white'>" + this.tr ( "Forgot Password ?" ) + "</i></center>";
      var btnForgot = new qx.ui.basic.Atom ( strForgot );
      btnForgot.set ( { cursor: 'pointer' } );
      lbl = btnForgot.getChildControl ( "label" );
      lbl.setRich ( true );
      lbl.setAllowGrowY ( true );
      btnForgot.addListener( "mouseover", function ( )  {
        btnForgot.setLabel ( "<u style='color: white'>" + strForgot + "</u>" );
      },this );
      btnForgot.addListener( "mouseout", function ( )  {
        btnForgot.setLabel ( strForgot );
      },this );
      btnForgot.addListener( "click", function ( )  {
        this.forgot ( );
      },this );
      this.add ( btnForgot, { top: 130, right: 10 } );

      var width = parseInt ( ( this.getWidth ( ) - 30 ) / 2, 10 );
      var btnLogin = this._createBtn ( this.tr ( "Log in" ), "#AAAAFF70", width, function ( ) {
         this.login ( );
      }, this );
      this.add ( btnLogin, { bottom: 10, left: 10 } );
      var btnSignup = this._createBtn ( this.tr ( "Sign Up" ), "#AAFFAA70", width, function ( ) {
         this.signup ( );
      }, this );
      this.add ( btnSignup, { bottom: 10, right: 10 } );
    }
  }
} );
Line 1: We define the class name following the qooxdoo naming convention.
Line 3: Instead of creating a Window with a title etc we simply create a Container
Line 4 – 14: The constructor takes care of the initialization. I want to point out qx.bom.Document.getHeight ( ) which will give you the size of the browser window.
Line 11 – 13: Getting the applications root window and adding the LoginWindow to the root.
Line 19 – 21: The semi transparent background. If we would set the opacity of the actual LoginWindow we would also create the buttons and the text with the set opacity which is not wanted.
Line 46 – 50: For the checkbox we want to change the text color to white. In order to achieve this we have to get the actual Label object, and then use plain HTML to change the color.
Line 52 – 67: Here we build a widget which behaves like a HTML link. There are many ways this could be done, so consider this one of the solutions. Also please note that I am using a Atom instead of a Button object here.
Line 69 – 77: Finally we create the Log In and Sign up buttons. This is done using a function which takes in the required attributes and a callback function.
Lets inspect how we create the buttons and their custom looks.
    _createBtn : function ( txt, clr, width, cb, ctx )  {
      var btn = new qx.ui.form.Button ( "<b style='color: white'>" + txt + "</b>" );
      btn.set ( { width: width, cursor: 'pointer' } );
      lbl = btn.getChildControl ( "label" );
      lbl.setRich ( true );
      btn.addListenerOnce ( "appear", function ( )  {
        this.setBGColor ( btn, "#AAAAAA00", "#AAAAAA00" );
      },this );
      btn.addListener ( "mouseover", function ( )  {
        this.setBGColor ( btn, clr, clr );
      },this );
      btn.addListener ( "mouseout", function ( )  {
        this.setBGColor ( btn, "#AAAAAA00", "#AAAAAA00" );
      },this );
      btn.addListener ( "execute", function ( e )  {
         cb.call ( this );
      }, ctx );
      return btn;
    },
    setBGColor : function ( btn, clr1, clr2 ) {
       var elem = btn.getContentElement ( );
       var dom  = elem.getDomElement ( );
       var img  = "linear-gradient(" + clr1 + " 35%, " + clr2 + " 100%)";
       if ( dom.style.setProperty )
            dom.style.setProperty ( "background-image", img, null );
       else
            dom.style.setAttribute ( "backgroundImage", img );
    },
Line 2 – 5 : The first few lines of the _createBtn function we create a button and then change the text color to white.
Line 6 – 8 : The first time the button is rendered we will go ahead and change the background color. If we call the function before the button is visible, then the DOM element would be null.
Line 9 – 14 : These two callback function handle the case when the mouse gets into and out of the widget. In this case we are going to change the background color of the button.
Line 15 – 17 : We handle the execute event and are going to call the registered function back. Please take note of the way I implemented the callback, which will retain the context ( object ) inside the function. In object oriented programming you want to always use and handle the data inside an object so it is important to remain in the appropriate context.
Line 20 – 28 : In order to set the buttons background color we have to modify the DOM element directly. Please remember that this is not the way I would change the style of a button if I wanted to use it throughout the rest of the application. This is a quick way to get to change the gradient background color.
… and action.
The following functions handle the button action.
    forgot : function ( )  {
      var forgot = new ao.apps.users.SoftwareSamurai.ForgotWindow ( );
      forgot.show  ( );
      this.destroy ( );
    },
    login : function ( )  {
      var name = this._name.getValue ( );
      var pass = this._pass.getValue ( );
      var remember = this._remember.getValue ( );
      if ( name.length < 1 || pass.length < 1 )  {
        alert ( this.tr ( "Please provie username and password" ) );
        return;
      }

      var str = "type=login";
      str += "&username="+name;
      str += "&password="+pass;
      str += "&remember="+remember;
      var app = qx.core.Init.getApplication ( );
      app.rpc ( str, function ( success ) {
        var win = null;
        if ( success )  {
          win = new ao.apps.users.SoftwareSamurai.ApplicationWindow ( );
          win.show ( );
          this.destroy ( );
        }
        else  {
          alert ( this.tr ( "Could not log in." ) );
        }
      }, this );
    },
    signup : function ( )  {
      var signup = new ao.apps.users.SoftwareSamurai.SignupWindow ( );
      signup.show  ( );
      this.destroy ( );
    },
Line 1 – 5 : The forgot function will create and display the ForgotWindow form and destroy the Login form.
Line 6 – 13 : we retrieve the values the user entered and do some basic sanity checking.
Line 15 – 18 : Here we build the query string to send to the back-end.
Line 19 – 20 : We get the application object to invoke the rpc function.
Line 21 – 29 : Once the server returns we check if we were successful in logging in. If yes, then we hide the Login form and start the main ApplicationWindow.
Line 32 – 36 : The signup function will create and display the SignupWindow form and destroy the Login form.
Let’s wrap it up
Congratulations, you have done it. You are now able to build your own complex web applications on a shared hosting service, such as Dreamhost with as little as $8,- per month.
 .
.
Resources
Live sample
Note: try user “test” and password “abc123” or create a new user.
Please follow this link here … to play with the code.