
In the last post we created a 360 degree image viewer in plain old javascript. we used the A-Frame framework and integrated the prev and next controls into the view itself.
This is a perfect solution if you want to display a series of 360 degree images ad you can hard-code the image locations in code. You can also modify the previous code and dynamically load images using PHP, NodeJS or any other server back-end.
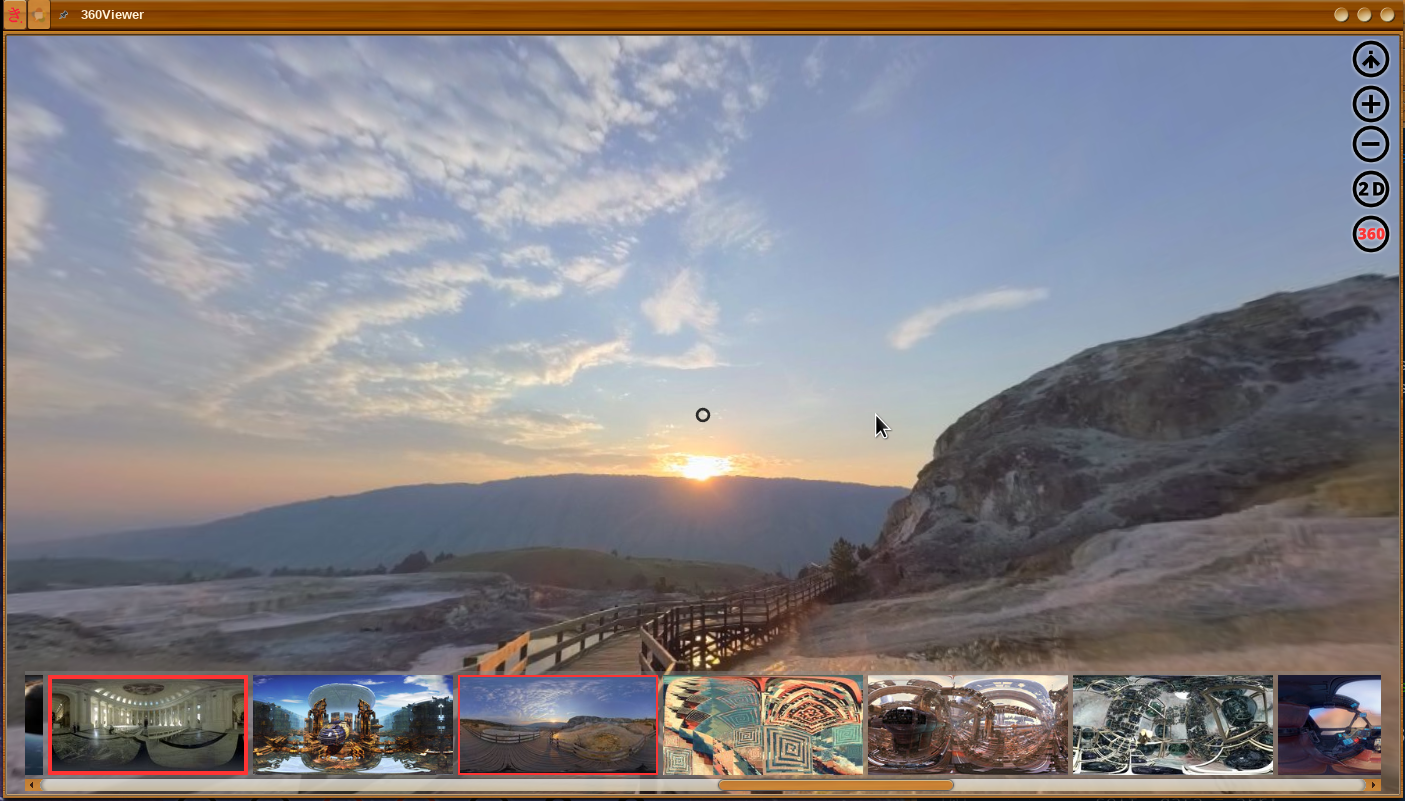
In this, the second part, of episode 5 we are actually going ahead and replace the in-frame controls with some overlay controls using the QooxDoo javascript libraries. Below is a screenshot of the final app.
Where do we get started :
I want to take you through the process of creating a new application from scratch. This process is true for smaller projects as well as for larger ones. It is valid for JavaScript, C++, Python, go and about any language you are using.
This process also holds true if you are working on larger commercial applications except that instead of writing actual code, the steps described here are documented in a design document, requirements-document, or captured in a use-case document.
I firmly believe that anyone can program and anyone can learn how to do it by simply following this pattern. One point to remember is to keep it simple, clean and small. the number of lines of code in your program should be a reflection of the functionality.
A lot of the code you will see in this post is the result of “I want X to happen with control Y“. In fact the first 200 lines of code build and animate the UI.
Lets go then…
When I started I knew that I wanted to create an app which has
- Forward and backward controls
- Can display images on a 2D canvas as well as in 360 degree
- I wanted to be able to view thumbnails of all ‘selected’ images
How do you design a UI with almost no existing requirements ?
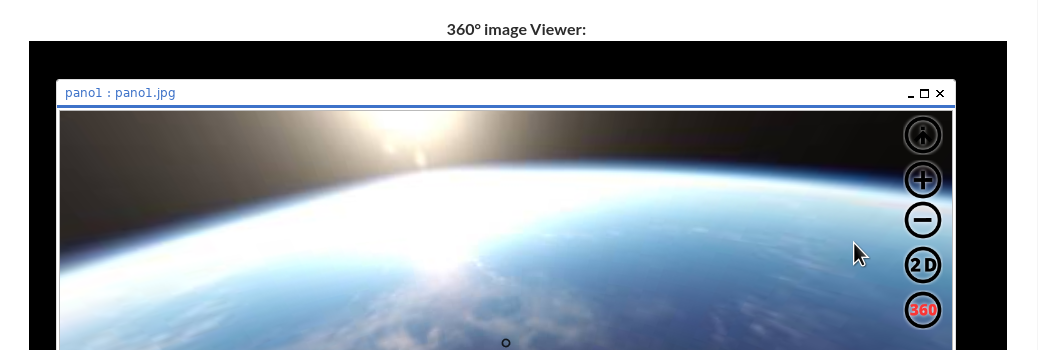
First I looked at the navigation buttons. I simply looked for prev and next button images. I decided to go with arrows as I could not find anything else I liked and simplicity is king. However I wanted to have a nicer interface than the ImageViewer.
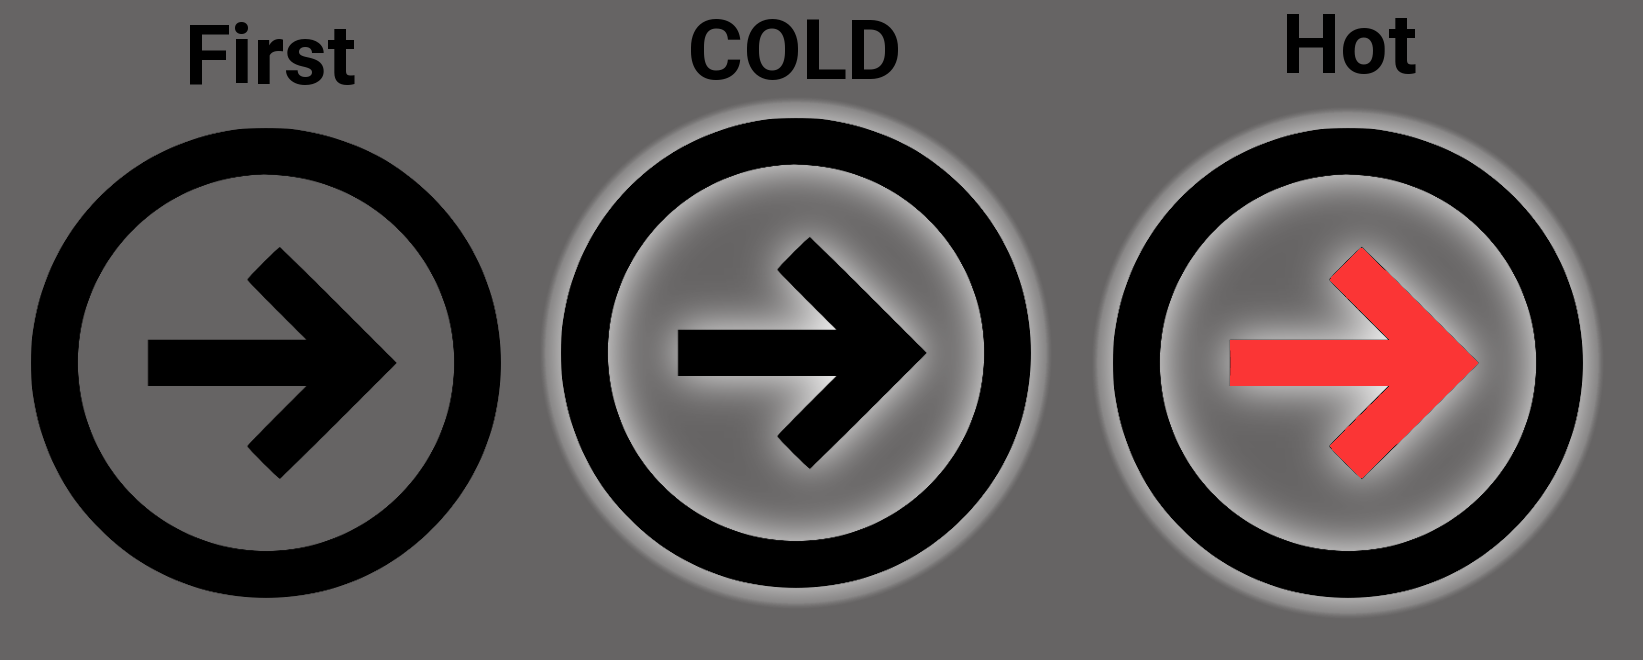
So instead of using a button object, I created a qx.ui.basic.Image object and added listener for the mouseenter, mouseout, and click events. Though now I needed a cold, and a hot image to indicate that there is something the user can interact with. Hmmm and come to think of it, the simple black and transparent arrow will not work on a black background. So back to the Gimp. Below is one of the eight buttons I created this way.
The javascript code to handle image buttons looks as follows:
     _createImgButton : function ( cold, hot, attr )  {
      var btn = new qx.ui.basic.Image ( this._path+cold+".png" );
      btn.set ( { scale: true, width: 40, height: 40 } );
      btn.hot = hot; btn.cold = cold;
      btn.addListener  ( "mouseover", function ( e )  {
         this._audio.play ( );
         btn.setSource ( this._path+btn.hot+".png" );
      }, this );
      btn.addListener  ( "mouseout", function ( e )  {
         btn.setSource ( this._path+btn.cold+".png" );
      }, this );
      this.add ( btn, attr );
      return btn;
    }
With this fragment in place we can now go ahead and build the interface.
A few notes are in order here though.
- The 360 Viewer is handled in an iframe to avoid global namespace collusion in the main application.
- Switching between a 2D image display and the 360 Viewer is a simple game of hide and show
- We use the touchstart rather then the click event because the A-Frame library does not forward click events anymore.
- Take a closer look at back, scroll, and lyt. Those will handle the preview strip at the bottom
- Finally the this._info button will show / hide the topRightMenu.
    _build2DWindow : function ( )  {
      var scroll = new qx.ui.container.Scroll ( );
      scroll.setBackgroundColor ( "#ddf" );

      var inner = new qx.ui.container.Composite ( new qx.ui.layout.Canvas ( ) );
      scroll.add ( inner, { left: 0,  top: 0 } );
      this._scroll2D = scroll;

      this._preview2D = new qx.ui.basic.Image ( null );
      this._preview2D.setScale ( true );
      inner.add ( this._preview2D, { left: 5, right: 5, top: 5, bottom: 5 } );
      this.add  ( scroll, { left: 0, right: 0, top: 0, bottom: 0 } );
      scroll.hide ( );
    },
    _buildWindow : function ( )  {
      this._build2DWindow ( );

      var iframe = new qx.ui.embed.Iframe ( this._path+"360IFrame.html" );
      this.add ( iframe, { top: 0, bottom: 0, left: 0, right: 0 } );
      iframe.addListenerOnce ( "appear", function ( ) {
         this._iframe = iframe;
      }, this );

      var back = new qx.ui.core.Widget ( );
      back.set ( { height: 120, backgroundColor: "#888888", opacity: 0.4 } );
      this.add ( back, { bottom: -110, left: 20, right: 20 } );
      this._back = back;

      var scroll = new qx.ui.container.Scroll ( );
      scroll.set ( { height: 120, contentPaddingLeft: 5, scrollbarX: "on" } );
      this.add ( scroll, { bottom: -120, left: 20, right: 20 } );
      this._scroll = scroll;

      var lyt = new qx.ui.layout.HBox ( 5 );
      lyt.set ( { alignY: "middle" } );
      this._previewStrip = new qx.ui.container.Composite ( lyt );
      scroll.add ( this._previewStrip );

      this._prev = this._createImgButton ( "prev", "prev-1", { left:  5,  top: "48%" } );
      this._next = this._createImgButton ( "next", "next-1", { right: 10, top: "48%" } );
      this._info = this._createImgButton ( "info_down", "info_down-1", { right: 10, top: 5 } );
      this._info.state = "up";

      this._zoomIn  = this._createImgButton ( "plus", "plus-1",  { right: 10, top:  -50 } );
      this._zoomOut = this._createImgButton ( "minus","minus-1", { right: 10, top:  -90 } );
      this._2d      = this._createImgButton ( "2d", "2d-1",      { right: 10, top: -135 } );
      this._360     = this._createImgButton ( "360-1", "360",    { right: 10, top: -180 } );

      this._zoomIn.addListener  ( "touchstart", this.zoomIn,    this );
      this._zoomOut.addListener ( "touchstart", this.zoomOut,   this );
      this._2d.addListener      ( "touchstart", this.switch2D,  this );
      this._360.addListener     ( "touchstart", this.switch360, this );
      this._2d.state  = "up";
      this._360.state = "down";

      this._back.addListener    ( "mouseover", this.mouseOver, this );
      this._back.addListener    ( "mouseout",  this.mouseOut,  this );
      this._previewStrip.addListener ( "mouseover", this.mouseOver, this );
      this._previewStrip.addListener ( "mouseout",  this.mouseOut,  this );

      this._prev.addListener ( "touchstart", function ( e )  {
         this._audio.play ( );
         this._curr--;
         if ( this._curr < 0 )
           this._curr =  this._data.length-1;
         this.displayImage ( );
      }, this );
      this._next.addListener ( "touchstart", function ( e )  {
         this._audio.play ( );
         this._curr++;
         if ( this._curr >= this._data.length )
           this._curr = 0;
         this.displayImage ( );
      }, this );
      this._info.addListener ( "touchstart", function ( e )  {
         var btn = this._info;
         if ( btn.state === "up" )  {
           btn.state= "down";
           btn.cold = "info_up";
           btn.hot  = "info_up-1";
           this._topRightMenu ( true );
         }
         else  {
           btn.state= "up";
           btn.cold = "info_down";
           btn.hot  = "info_down-1";
           this._topRightMenu ( false );
         }
      }, this );
    }
Congratulations, at this point you have all the controls in place. However a modern interface requires some bling.
Thankfully QooxDoo makes this easy as well.
Animating to see
Burried deep within the API documentation is a little nugget which allows you to animate items around without a lot of code.
    animate : function ( dir, itm, start, end, dur )  {
      var kf, dom = itm.getContentElement ( ).getDomElement ( );
      if ( ! dom )
        return;
      if ( dir === "up" )  {
        kf = { 0: { top: start+"px" },
             100: { top:   end+"px" } };
        dom.style.top = kf[100].top;
        itm.setLayoutProperties ( { top: end } );
      }
      if ( dir === "down" )  {
        var parentHeight = dom.parentElement.offsetHeight;
        var height = dom.offsetHeight;
        kf = { 0: { top: (parentHeight -start -height)+"px" },
             100: { top: (parentHeight -  end -height)+"px" } };
        dom.style.top = kf[100].top;
        itm.setLayoutProperties ( { bottom: end } );
      }
      if ( dir === "left" )  {
        kf = { 0: { left: start+"px" },
             100: { left:   end+"px" } };
        dom.style.left = kf[100].left;
        itm.setLayoutProperties ( { left: end } );
      }
      if ( dir === "right" )  {
        var parentWidth = dom.parentElement.offsetWidth;
        var width = dom.offsetWidth;
        kf = { 0: { left: (parentWidth -start -width)+"px" },
             100: { left: (parentWidth -  end -width)+"px" } };
        dom.style.left = kf[100].left;
        itm.setLayoutProperties ( { right: end } );
      }

      var anim = { duration: 600, timing: "ease-out", keep: 100, keyFrames : kf };
      qx.bom.element.Animation.animate ( dom, anim );
    },
    _showControls : function ( show )  {
      if ( show === true )  {
        this.animate ( "down", this._back,   -110, 5, 600 );
        this.animate ( "down", this._scroll, -120, 5, 600 );
        this.animate ( "left", this._prev,   5,  -45, 600 );
        this.animate ( "right",this._next,   5,  -45, 600 );
      }
      else {
        this.animate ( "down", this._back,   5, -110, 600 );
        this.animate ( "down", this._scroll, 5, -120, 600 );
        this.animate ( "left", this._prev,    -45, 5, 600 );
        this.animate ( "right",this._next,    -45, 5, 600 );
      }
      this._isOpen = show;
    },
    _topRightMenu : function ( expand )  {
      if ( expand )   {
        this.animate ( "up", this._zoomIn,  -50, 50, 600 );
        this.animate ( "up", this._zoomOut, -90, 90, 600 );
        this.animate ( "up", this._2d,     -135,135, 600 );
        this.animate ( "up", this._360,    -180,180, 600 );
      }
      else {
        this.animate ( "up", this._zoomIn,  50, -50, 600 );
        this.animate ( "up", this._zoomOut, 90, -90, 600 );
        this.animate ( "up", this._2d,     135,-135, 600 );
        this.animate ( "up", this._360,    180,-180, 600 );
      }
    },
Here is what the code does.
this._back and this._scroll are the controls for the image strip at the bottom. All other controls are image buttons. The core of the animate function is the qx.bom.element.Animation.animate ( dom, anim ); call, which takes the dom element and the animation attributes in form of the anim – object.
The most important information which we have to take care of are the key frames. those keyframes define the attribute values for the range of 0% ( beginning of the animation ) and 100% ( end of animation ). The system will take care of the intermediate positions.
Note: since we directly modify the dom element we will also have to tell the QooxDoo framework of the ‘layout change’ That is the reason we itm.setLayoutProperties ( { right: end } );. Without these calls QooxDoos’ layout engine would re-position the dom elements to its original position at the next refresh.
More JavaScript, I WANT MORE !!!!
- mouseOver, and mouseOut is triggered by the preview strip at the bottom. It is like the taskbar which will auto-hide in windows.
- switch2D, and switch360 trigger the hide and show spiel when we swich the view. Really nothing to it but powerful nevertheless.
- _toggleBtn switches the hot, and cold state of a button. The icons have been named in a way where a “-1” appended to the name indicates an active position E.g. prev.png and prev-1.png
    _toggleBtn : function ( btn, state, icon )  {
      if ( state === true )  {
        btn.state = "down";
        btn.hot   = icon;
        btn.cold  = icon+"-1";
      }
      else  {
        btn.state = "up";
        btn.hot   = icon+"-1";
        btn.cold  = icon;
      }
      btn.setSource ( this._path+btn.cold+".png" );
    },
    switch2D : function ( )  {
      this._toggleBtn ( this._2d,  true,  "2d" );
      this._toggleBtn ( this._360,false, "360" );
      this._iframe.hide   ( );
      this._scroll2D.show ( );
      this._mode2D = true;
      this.displayImage ( );
    },
    switch360 : function ( )  {
      this._toggleBtn ( this._2d, false,  "2d" );
      this._toggleBtn ( this._360, true, "360" );
      this._iframe.show   ( );
      this._scroll2D.hide ( );
      this._mode2D = false;
      this.displayImage ( );
    },
    mouseOver : function ( ) {
      if ( this._timer )  {
           this._timer.stop ( );
           this._timer = null;
      }
      if ( this._isOpen === true )
        return;
       this._showControls ( true );
    },
    mouseOut : function ( ) {
      if ( this._timer !== null )
        return;
      this._timer = qx.event.Timer.once ( function ( ) {
         // After 5 seconds ... hide
         this._isOpen = false;
         this._timer  = null;
         this._showControls ( false );
      }, this, 5000 );
    },
200 Lines Of Code Great you are sticking with me here. I know it looks like a lot of code but see what we did thus far was simply to create a bunch of controls and took care of the way they are being displayed and animated.
At this point there are only two missing pieces to complete this application.
- Loading the image data and displaying it in the preview-strip.
- Displaying the active image in the main area
Faking it
In order to continue the client side code we will first use a fake response from a backend. Stricktly speaking we only need the image, and possibly a smaller version of it in form of a thumbnail. The code below will do just fine for now.
    loadImages : function ( )  {
      // Testing functionality
      var arr = [];
      for ( var t=0; t<200; t++ )  {
        var i = t*2;
        arr.push ( { name: "pano"+i,  src: "pano1.jpg", thumb: null, text: "Space Earth" } );
        arr.push ( { name: "pano"+i+1,src: "pano2.jpg", thumb: null, text: "Mountain Water" } );
      }
      this._data = arr;
      var idx, cnt = 0;
      for ( idx in arr )  {
        this._addImage ( arr[idx], cnt++ );
      }
    },
Once we have the backend in place we will replace the above with :
    loadImages : function ( )  {
      // E.g. this._origSource = "AstraNOS:/Desktop/Courses/Episode 5/prev.png";
      var parms = [ this._origSource ];
      if ( ! this._rpc )
        this._rpc = new qx.io.remote.Rpc ( "services.php", "apps.system.360Viewer.360Viewer" );
      this._rpc.setTimeout ( 10000 ); // 10 seconds wait
      this._rpc.setCrossDomain ( false );
      var self = this;
      this._rpc.callAsync ( function ( arr, exception )  {
        if ( exception === null )  {
          self._data = arr;
          var idx, cnt = 0;
          for ( idx in arr )  {
            self._addImage ( arr[idx], cnt++ );
          }
          self._curr = 0;
          self.displayImage ( );
        }
        else  {
          alert ( "Something went wrong : " + exception );
        }
      }, "getImageList", parms );
    },
So there are a few things in the above function we should talk about
Line 02 : this._origSource is the expected input for the backend call. AstraNOS indicates that it is ‘locally’ stored and not on E.g. DropBox. Then we want to point to a image from the system. It is set when the user opens the application.
Line 03 : parms contains an array of attributes which is passed into the function on the server side.
Lines 05 – 09 : Create the RPC object. I will write another blog post soon talking about the php backend. In short your root directory on the server contains services.php, which calls a php function in class “class_360Viewer” called “getImageList” with attributes “parms”.
Lines 10 – 21 : Here we handle the callback, receive the data from the server and add a single image per array entry to the preview-strip.
and here is the _addImage function.
    _addImage : function ( itm, idx )  {
      var thumb = itm.thumb ? itm.thumb : itm.src;
      var icon  = new qx.ui.basic.Image ( );
      icon._idx = idx;
      qx.io.ImageLoader.load ( thumb, function ( src )  {
        icon.setSource ( src );
        icon.set ( { padding: 0, scale: true, maxWidth: 200, maxHeight: 100, width: 200, height: 100, backgroundColor: "#FF3333" } );
        icon.addListener ( "mouseover", function ( e ) {
           this._audio.play ( );
           icon.set ( { padding: 4 } );
        }, this );
        icon.addListener ( "mouseout", function ( e ) {
           var pad = this._curr === icon._idx ? 2 : 0;
           icon.set ( { padding: pad } );
        }, this );
        icon.addListener ( "touchstart", function ( e ) {
           this._curr = icon._idx;
           this.displayImage ( );
        }, this );
        this._previewStrip.add ( icon );
      }, this );
    },
Display the image already
We are almost complete. The following four functions handle the display of the image in both 2D, and 360 degree form.
- getCurrentImage returns the current image either in thumbnail form or as teh full resolution image
- displayImage displays the current image by first displaying the thumbnail, followed by the full sized image. This will improve usability as the thumbnail is already cached in the preview-strip.
- _displayImage takes care of actually displaying the image in either 2D or 360 degree view based on the selected mode.
- scaleImage this function is only required for the 2D view in order to properly fit it into the view-port of the window.
    getCurrentImage : function ( getThumb )  {
      if ( getThumb === true )
        return this._data[this._curr].thumb;
      return this._data[this._curr].src;
    },
    displayImage : function ( )  {
      if ( ! this._iframe )
        return;
      var cnt = 0, kids = this._previewStrip.getChildren ( );
      for ( var idx in kids )  {
        kids[idx].set ( { padding: 0 } );
        if ( cnt++ === this._curr )
          kids[idx].set ( { padding: 2 } );
      }
      var fname = this.getCurrentImage ( ).match(/[-_\w]+[.][\w]+$/i)[0];
      this.setCaption ( this._data[this._curr].name + " : " + fname );
      this._displayImage ( this.getCurrentImage ( true ) );
      this._displayImage ( this.getCurrentImage ( ) );
    },
    _displayImage : function ( src )  {
      if ( this._mode2D === false )  {
        var  win = this._iframe.getWindow ( );
        if ( win )
          win.changeTo ( src );
      }
      else  {
        qx.io.ImageLoader.load ( src, function ( src )  {
          var loaded= qx.io.ImageLoader.isLoaded ( src ); // Needed to make sure we have size info
          this._preview2D.setSource ( src );
          var s = qx.io.ImageLoader.getSize ( src );
          if ( typeof ( s.width ) !== "undefined" && typeof ( s.height ) !== "undefined" )
             this.scaleImage ( s.width, s.height );
        }, this );
      }
    },
    scaleImage : function ( iW, iH )  {
      var  x, y, w, h;
      if  ( this._scaleImage ) {
        var space = this._scroll2D.getInnerSize ( );
        w = space.width  - 10;
        h = space.height - 10;
        if ( iW/iH > w/h )  {
          var h1 = h;
          h = parseInt ( iH / iW * w, 10 );
          x = 5;
          y = parseInt ( ( h1 - h ) / 2, 10 ) + 0;
        }
        else  {
          var w1 = w;
          w = parseInt ( iW / iH * h, 10 );
          y = 5;
          x = parseInt ( ( w1 - w ) / 2, 10 ) + 0;
        }
      }
      else  {
        w = iW; h = iH;
        x = 0;  y = 0;
      }
      this._preview2D.setWidth  ( w );
      this._preview2D.setHeight ( h );
      this._preview2D.setLayoutProperties ( { top: y, left: x } );
    },
construct “The end”
So here is the constructor then and the resize function
qx.Class.define ( "ao.apps.users.SoftwareSamurai.360Viewer",
{
  extend : qx.ui.window.Window,
  construct : function ( ) {
    this.base ( arguments );
    this.setLayout ( new qx.ui.layout.Canvas ( ) );
    this.setLayoutProperties ( { top: 10, left: 100 } );
    this.set  ( { contentPadding: 2, opacity: 1.0, width: 1400, height: 800 } );

    this._path   = ao.prefix+"apps/users/SoftwareSamurai/";
    this._data   = [];
    this._curr   = 0;
    this._timer  = null;
    this._mode2D = false;
    this._scaleImage = true; // 2D
    this._origSource = "";   // Handling autosatrt and loading of all images in this dir

    // Buffering the putton images.
    this._imgBuff = [];
    this._audio  = new qx.bom.media.Audio ( this._path+"click.ogg" );
    this._iframe = null;
    this._isOpen = false;
    this.addListener  ( "resize", this._resize, this );
    this._buildWindow ( );
    if ( typeof ao !== "undefined" && typeof ao.desktop !== "undefined" )  {
      // Note ao.desktop is a class derived of qx.ui.desktop.Desktop ...
      ao.desktop.addWin ( this );
    }
    else  {
      var app = qx.core.BaseInit.getApplication ( );
      var root = app.getRoot ( );
      root.add ( this );
      this.show ( );
    }
    this.loadImages   ( );
  },
  _resize : function ( )  {
    if ( this._mode2D === true )
      this.displayImage ( );
  },
Phew, we went through 375 lines of code here but who is counting ?
At this point all that is left to do is to show the goods.
Please follow this link here … to play with the code.